Microlife Devices - User Guide
The Microlife Devices, allow remote monitoring of patients within the comfort of their own home or residence, following their discharge from hospital or other health care settings.
The devices can be used via Bluetooth, connecting to the My Inhealthcare Patient App to provide readings for the patient, which are then submitted for clinicians to review or used in a manually setting.
Please click on the below arrows, to view the guidance.
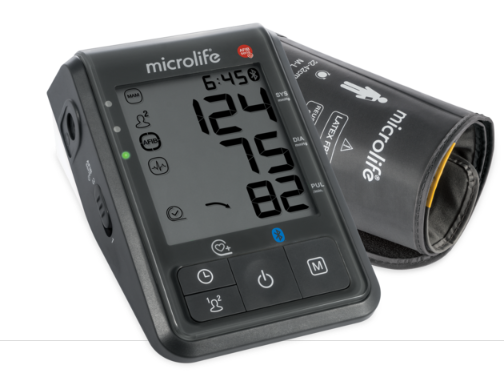
Blood Pressure Monitor
This section is relevant for patients that will be taking their:
- A blood pressure reading
- A pulse rate
Device Setup
- The device will already have the batteries placed inside.
- To replace the batteries, switch the lock switch (on the right side of the device) to the ‘unlock’ position. The battery compartment is located on the bottom of the device.
- The device requires 4 x 1.5 V, size AAA batteries. Connect the cuff to the device by inserting the cuff connector (orange plug at the end of the cuff cable) into the cuff socket (orange entry point on the left side of the device) as far as it will go.
Checklist for Patients Taking a Reliable Reading
- Avoid eating, bathing, smoking, or caffeine approx. 30 minutes before the measurement.
- Sit on a back-supported chair and keep your legs uncrossed and feet flat on the floor.
- Remove close-fitting garments from the upper arm.
- Sit down on a back-supported chair and relax for 5 minutes. Keep the feet flat on the floor.
- Always measure the same arm (usually left). It is recommended to perform double arm measurements to determine which arm to measure in the future. The arm with the higher blood pressure should be measured.
- Sit down on a back-supported chair and relax for 5 minutes. Keep the feet flat on the floor and do not cross your legs.
- Always ensure that the correct cuff size is used (marking on the cuff). Fit the cuff closely, but not too tight. Make sure that the cuff is positioned 1-2 cm above the elbow. The artery mark on the cuff (ca. 3 cm long bar) must lie over the artery which runs down the inner side of the arm. Support your arm so it is relaxed. Ensure that the cuff is at the same height as your heart.
Taking the Reading
- With your cuff correctly fitted to your upper arm (as per the checklist above), press the START/STOP button to start the measurement.
- The cuff will now pump automatically. Relax, do not move, and do not tense your arm muscles until the measurement result is displayed. Breathe normally and do not talk.
- During the measurement, the pulse indicator flashes in the display.
- The result, comprising the systolic (larger number at the top, below the time) and the diastolic (smaller number below the systolic reading) blood pressure and the pulse rate (number below the diastolic reading) is displayed.
- When the device has finished measuring, remove the cuff.
- Switch off the device (the monitor does switch off automatically after approx. 1 min.).
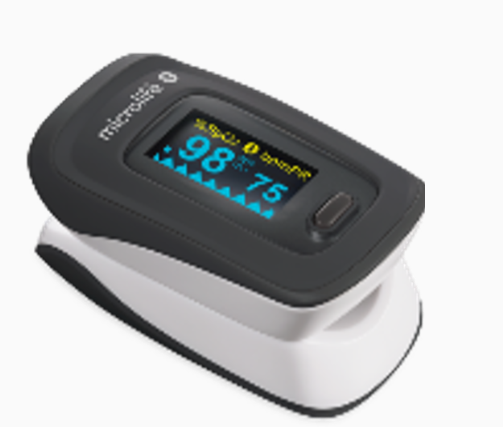
Pulse Oximeter
This section is relevant for patients that have been asked to provide:
- An oxygen saturation (SpO2) reading
- A pulse rate
Device Setup
- The device will already have the batteries placed inside.
- The battery compartment is located on the bottom of the device. The device requires 2 x 1.5 V, size AAA batteries.
Checklist for Patients Taking a Reliable Reading
- The height of the bar graph (left side of the display) is an indication of the pulse and signal strength. The bar should be greater than 30% for a proper reading.
- The device must be able to measure the pulse properly to obtain an accurate SpO2 measurement. Verify that nothing is hindering the pulse measurement before relying on the SpO2 measurement.
- The maximum application time at a single site should be less than 30 minutes, to ensure correct sensor alignment and skin integrity.
Taking the Reading
- Insert one finger (nail side up; index or middle finger is recommended) into the finger opening of the device. Be sure to fully insert the finger so that the sensors are completely covered by the finger.
- Release the device allowing it to clamp down on the finger.
- Press the ON/OFF button to turn the device on.
- Do not shake your finger during the test. It is recommended that you do not move your body whilst taking a reading.
- Your measurement values will appear on the screen after a few seconds.
- Remove your finger from the device.
- The device will automatically switch off after approx. 8-12 seconds after the finger is removed from the device.
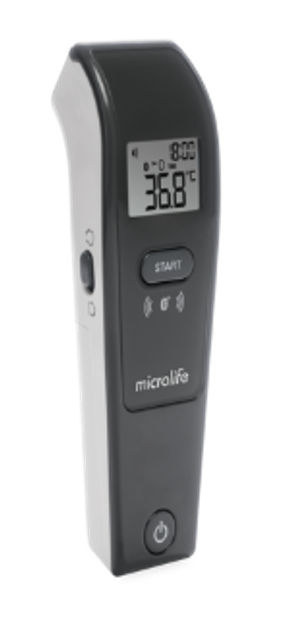
Non-Contact Thermometer
This section is relevant for patients that will be taking their:
- A body temperature reading
Device Setup
- The device will already have the batteries placed inside.
- The battery compartment is located on the bottom of the device. he device requires 2 x 1.5 V, size AAA batteries. Make sure the device is in ‘Body’ mode.
- The toggle on the left side of the device should be pointing upwards, towards the person’s head and away from the house.
Checklist for Patients Taking a Reliable Reading
- Patients and thermometer should stay in a similar room condition for at least 30 minutes.
- Don’t take a measurement while or immediately after nursing a baby.
- Don’t use the thermometer in high humidity environments.
- Patients should not drink, eat, or exercise before/while taking the measurement.
- Don’t move the measurement device from the measuring area before hearing the termination beep.
- Always take the temperature in the same location, since temperature readings may vary according to locations.
- Where possible, have someone take your reading for you.
Taking the Reading
- Press the ON/OFF button at the bottom of the device. The display is activated to show all segments for 1 second.
- When the C or F icon is flashing, a beep sound is heard, and the thermometer is ready for measuring.
- Aim the thermometer at the centre of the forehead with a distance of no more than 5 cm. Please remove any hair, sweat or dirt from the forehead before measuring to improve the accuracy of the readings.
- Press the START button and ensure that the activated blue tracking light is aimed at the centre of the forehead. If you are taking the reading yourself without any assistance, use a mirror to help aim the thermometer accurately. After 3 seconds a long beep will verify the completion of the measurement.
- Read the recorded temperature from the LCD display.
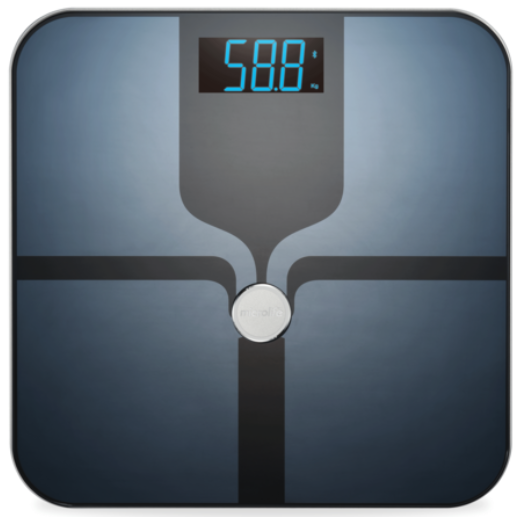
Diagnostic Scale
This section is relevant for patients that will be taking their:
- Weight
Device Setup
- The device will already have the batteries placed inside. This scale operates with 4 x 1.5 V alkaline batteries; size AAA.
- When the batteries are dead the display shows «Lo».
- Open the battery compartment 3 on the bottom of the device.
- Replace the batteries – ensure correct polarity as shown by the symbols in the compartment.
- Do not discard the batteries together with the normal wastes, discard with special wastes.
- Remove the batteries if the scale is not used for long periods of time.
Checklist for Patients Taking a Reliable Reading
- Place the scale on a flat, hard surface. Soft, inaccurate flooring (e.g. rugs, carpets, linoleum) can cause the scale to give uneven reading of your weight.
- Step onto the scale with your feet parallel and weight equally distributed.
- Stand still while the scale measures your weight.
- It is important to weigh yourself with dry, bare feet, correctly positioned on the electrodes. Moreover, for the scale to work properly, avoid your legs touching.
- The scale is safe to use as a simple scale by everyone being powered by 4 x 1.5 V alkaline batteries; size AAA. However, the following people should not perform a body fat or body water measurement:
- pregnant women
- people on cardiovascular medication
- those fitted with a pace-maker or other forms of electronic, medical equipment
- those with a temperature
- children under the age of 10
- those in dialysis, with oedemas on their legs, people with dimorphism or suffering from osteoporosis
- Always weigh yourself on the same scale each day at the same time, preferably undressed and before breakfast. To get the best results from your scale, weigh yourself twice, and if the two weights are different from each other, your weight is between the two readings. Wait for about 15 minutes after getting up, so that the water can distribute itself around your body.
- The surface of the scale can be slippery, if wet.
- If an error occurs during the analysis of your body fat and water percentage, the scale will turn off itself automatically.
- The precision of this fat and water percentage measurement can be altered in the following cases:
- a high alcohol level
- a high level of caffeine or drugs
- after an intense sports activity
- during an illness
- during pregnancy
- after heavy meals
- in presence of dehydration problems
- your personal data (height, age, sex) have not been input correctly
- if you have wet or dirty feet
Taking the Reading
- Step on the scale with bare feet and ensure that you are standing still with equal weight distribution and with both feet on the ITO electrodes.
- The scale weighs immediately. The weight is displayed first.
- Weight, BMI, body fat, water, muscle, bone, BMR and visceral fat will be shown in the following:
- Weight in kg
- Body mass index (BMI)
- Body fat in %
- Body water in %
- Bone mass in kg
- Muscle percentage in %
- Basal metabolic rate in kcal (BMR)
- Visceral fat
- There must be no contact between your left and right feet, legs, calves of thighs; others the measurement cannot preformed correctly.
- The measurement result will be incorrect if the user measures with socks on.
Troubleshooting
Below are the potential error codes that can display on the devices, the possible causes of these and also guidance on how to resolve. Please click on the below arrows, to view the guidance.
Blood Pressure Monitor
Err5
Possible Causes
The patient’s smart device is connected and the BP Monitor Device is displaying the measurement, however, it is not sending measurements through to the Patient App.
How to Fix
The patient has not allowed the pairing of the BP Monitor Device or the patient’s smart device requires re-connecting and paring again via their Bluetooth settings, as well as the BP Monitor Device.
To unpair the BP Monitor Device:
- Navigate to the patient's smart device Bluetooth settings.
- 'forget' or 'unpair' the Microlife device i.e. A6 Connect.
- Log back into the My Inhealthcare Patient App.
- Re-take the reading.
- The pair prompt will display on the device.
- Press PAIR or OK.
- The measurement will then display in the app.
BP101
Possible Cause
The BP Monitor Device itself has triggered a timeout.
How to Fix
Turn the device OFF and then back ON and re-take the reading.
Device Reset
Possible Cause
The BP Monitor Device is taking the measurement, however, this is not transferring through to the My Inhealthcare Patient App.
How to Fix
To reset:
- Hold the ON button down on the device, for 8-10 seconds, until the Bluetooth symbol, in the top right-hand side, begins to flash.
- At the next monitoring time for the patient, they will take their measurement as usual on the BP Monitor Device, this will then prompt a PAIR notification, select PAIR or OK, to allow the smart device to connect.
- The BP Monitor Device will now be connected to the patients smart device.
BP102
Possible Cause
BP Monitor Device is unable to connect the readings to the patient’s mobile device.
How to Fix
Reset the BP Monitor Device (see reset device above). Take the reading again, press connect to Microlife device on the App, this will prompt a pair screen to show on the patient’s mobile device. Press PAIR or OK, this will re-pair the device.
BP103
Possible Cause
The BP Monitor Device is not displaying any measurements.
How to Fix
Turn the Microlife device OFF and back ON and re-take the reading.
B003
Possible Cause
The Bluetooth request timed out and no measurements were received from the BP Monitor device in the allowed scanning time.
How to Fix
The BP Monitor Device can scan up to 6 minutes, please be patient. Re-take the measurement.
Err 1
Possible Cause
Signal is too weak.
How to Fix
The pulse signals on the cuff are too weak. Re-position the cuff and re-take the measurement.
Err 2
Possible Cause
Error signal.
How to Fix
During the measurement, the error signals were detected by the cuff, however, this caused for instance by movement or muscle tension. Please re-take the measurement, keeping your arm still.
Err 3
Possible Cause
Abnormal cuff pressure or an adequate pressure cannot be generated in the cuff.
How to Fix
Make sure the cuff is correctly positioned on the arm and is not too loose. Re-take the measurement. Replace the batteries if necessary.
Err 5
Possible Cause
Abnormal result. The measuring signals are inaccurate, and no result can therefore be displayed.
How to Fix
Make sure the cuff is placed correctly on the arm and is not loose. Re-take the measurement.
Bluetooth Symbol Blinking Rapidly
Possible Cause
Bluetooth connection error.
How to Fix
Turn OFF the BP Monitor Device, forget or re-pair the Bluetooth device on the patients smart device. Wait for 1 minute and log into the Patient App. Take the reading again, press connect to Microlife device on the App, this will prompt a pair screen to show on the patient’s mobile device. Press PAIR or OK, this will re-pair the device
Pulse Oximeter
SpO2 or pulse rate do not display normally.
Possible Cause
Finger is not inserted properly or there is excessive illumination.
How to Fix
Retry inserting the finger and measure again. Try turn the device OFF and back ON and retry.
SpO2 or pulse rate is shown unstable.
Possible Cause
The finger might not be inserted deep enough or there is excessive patient movement.
How to Fix
Re-insert the finger into the device, and calmly sit and re-take the measurement.
The device cannot be powered on.
Possible Cause
Low battery power or the batteries are not installed correctly.
How to Fix
Replace the batteries if required or take the current batteries out and re-enter them.
The display suddenly switches off.
Possible Cause
The device automatically powers off when no signal is detected, after 10 seconds. The battery power may be too low to operate.
How to Fix
Replace the batteries if required or re-try take the measurement.
The Pulse Oximeter Monitor is not connecting
Possible Cause
The Pulse Oximeter Monitor is not connecting to the patient’s smart device, therefore, preventing the measurement from transferring to the My Inhealthcare Patient App. The patient has now allowed the Pulse Oximeter Monitor to PAIR or CONNECT with their smart device.
How to Fix
Turn the device ON and OFF and re-take the measurement. Forget the Bluetooth connection in the patient’s smart device (if already connected) and unpair. Re-take the measurement, this will then prompt a PAIR notification, press PAIR or OK to connect.
P104
Possible Cause
The Pulse Oximeter Monitor is connected to the patient’s smart device; however, it has not supplied a reading.
How to Fix
The Pulse Oximeter Monitor has been turned ON, however, the finger has not been placed long enough by the patient, for the device to take a reading. Place the finger in the device and re-take the reading.
P103
Possible Cause
The Pulse Oximeter Monitor has timed out.
How to Fix
Turn the device OFF and ON and retry taking the measurement.
B003
Possible Cause
The Bluetooth request timed out and no measurements were received from the device, in the allowed scanning time.
How to Fix
The pulse oximeter will scan for 30 seconds, before presenting a measurement. If this continues to still not show a measurement, turn the Microlife device OFF and ON and re-take the measurement.
Non-Contact Thermometer
Temperature Display
Possible Cause
How to change the monitor display for temperature (Celsius and Fahrenheit).
How to Fix
Hold the START button for 5 seconds. The current temperature setting will show, change to the appropriate.
Error function in display
Possible Cause
There is an error with displaying the measurement.
How to Fix
Turn the device OFF and ON and re-take the reading.
Blank Display
Possible Cause
The device is displaying a blank screen.
How to Fix
Ensure the batteries have been inserted correctly and re-take the measurement.
Flat Battery Indicator
Possible Cause
The device has a flat battery.
How to Fix
Replace the batteries.
T001
Possible Cause
The device has been turned ON but not been used to take a measurement.
How to Fix
Turn the device OFF and ON and re-take the reading.
T004
Possible Cause
The device has stopped broadcasting with a connect timeout event.
How to Fix
Turn the device OFF and ON and re-take the reading.
T006
Possible Cause
The device is disconnecting before reconnecting.
How to Fix
Turn the device ON and wait for 1 minute. Re-take the measurement.
No Measurements Displaying
Possible Cause
No measurements are displaying on the Non-Contact Thermometer.
How to Fix
Turn the device ON and wait for 1 minute. Re-take the measurement.
B003
Possible Cause
The Bluetooth request timed out and no measurements were received from the device, in the allowed scanning time.
How to Fix
Re-take the measurement. If this continues to still not show a measurement, turn the Microlife device OFF and ON and re-take the measurement.