User Management
The Super-User (also known as Organisation Administrator) role, enables the management of users within the environment. This includes, the creation and removal of users, the modification of existing users and the ability to restrict or grant new access roles.
Users
Roles & Permissions
The assigned user roles that a user has, will define the access and type of tasks that they can preform within the platform.
Roles & Permissions Explained
| Action | Clinician | Patient Administrator | Care Worker | Admin Centre User |
|---|---|---|---|---|
| Create patient records | ✔️ | |||
| Edit patient information | ✔️ | ✔️ | ||
| View patient records | ✔️ | ✔️ | ✔️ | |
| Add patient notes | ✔️ | |||
| View patient readings | ✔️ | ✔️ * | ||
| Add patient readings | ✔️ | ✔️ | ||
| Upload patient readings (to your GP system through the IHDA) | ✔️ | |||
| Activate services | ✔️ | |||
| Edit services | ✔️ | |||
| Deactivate services | ✔️ | |||
| Deactivate patients | ✔️ | |||
| View alerts | ✔️ | ✔️ | ✔️ | |
| Assign alerts | ✔️ * | ✔️ | ||
| Process alerts | ✔️ | ✔️ |
* These permissions can be enabled/disabled by an Organisation administrator.
In addition to the above, the following roles might be made available to you:
Asset developer – users with this role can create basic assets in the IHC toolkit.
Reporting – users have the ability to run and schedule reports via the IHC Customer Dashboard
Organisation administrator - users are able to:
Manage permissions within their organisation
Ability to reset passwords for colleagues
Add, amend or delete admin centres within their organisation
Add, amend or delete care facilities within their organisation
Add, amend or delete users within their organisation
All of the outlined permissions and actions may be overridden by the functionality built into specific services. If this is the case, the user guide for the pathway/service will clarify the actions you can perform.
New User
To add a new user to your organisation:
Click onto the Organisation Administration tab.
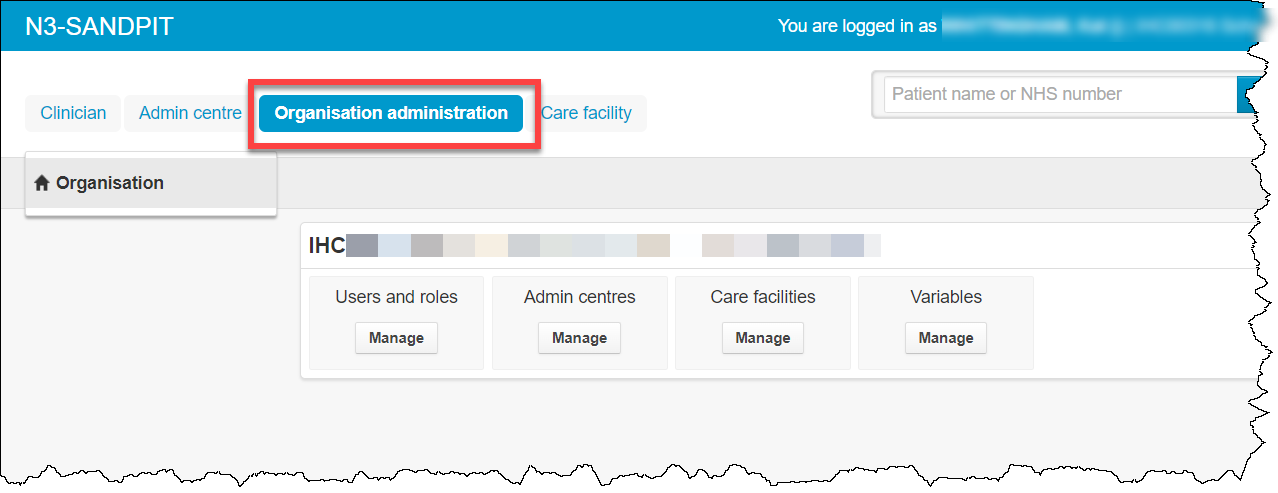
Select the Manage button, under Users and roles.
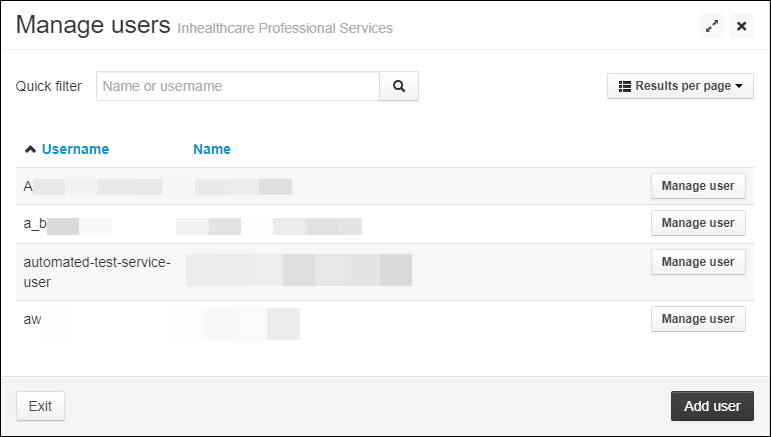
The Manage users screen will open, displaying a list of all current users in your organisation.Click Add User.
Complete all applicable details on the Add user screen.
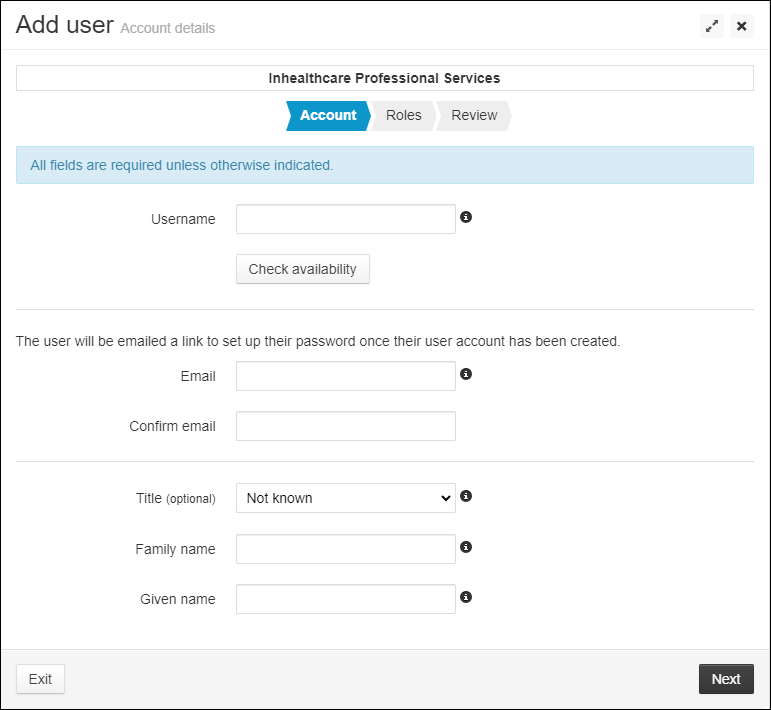
- Click Check Availability after entering a Username, if the username is available this will then show in green. If red, the username is unavailable and you must choose another.
TIP
Usernames cannot be changed once created, so please ensure the username follows the same format as the existing users i.e, john.smith.
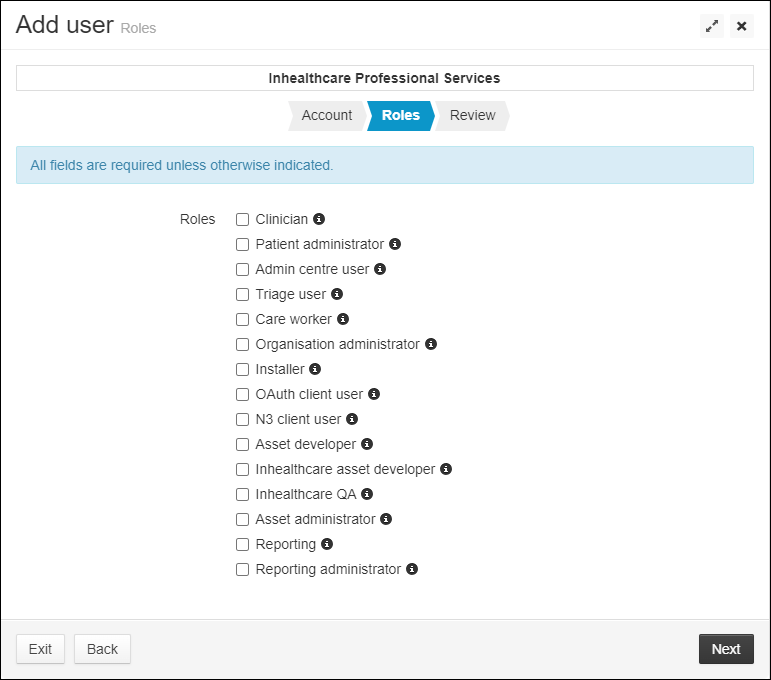
Click Next. The Add user Roles screen will open.
Choose the relevant user roles and click Next.
If Admin centre user was chosen as one of the roles for this user, the Assign admin centre screen will display.
Use the drop-down to Choose an admin centre. This drop-down will automatically populate with the admin centres created within your organisation.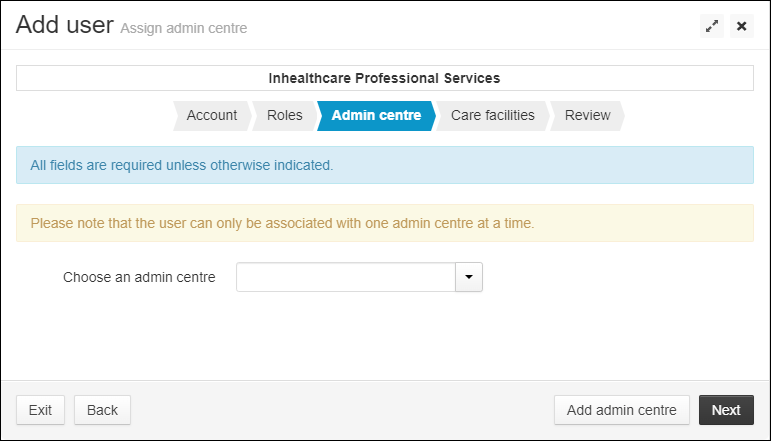
If you did not select the Admin centre user role, skip this step.Click Next.
If Care worker was chosen as one of the roles for this user, the Assign care facilities screen will display.
Use the drop-down to Choose a care facility. This drop-down will automatically populate with the care facilities created within your organisation.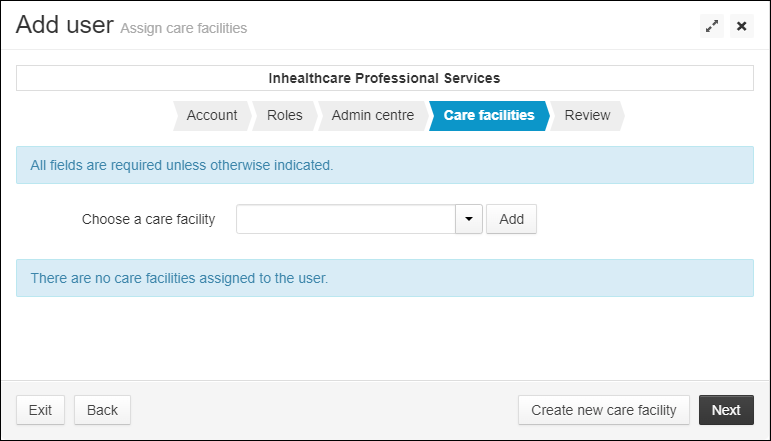
If you did not select the Care worker role, skip this step.TIP
Ensure you click the Add button after populating the Care Facility drop-down. More than one Care Facility can be added to a user.
Click Next. The Review screen will show.
Click Finish to save the new user.
The user will receive an automated email to the address entered. This will include a link to set the password for their new login.
Edit User Details or Roles
To edit a user's details or user roles:
Navigate to the Organisation Administration tab.
Select Manage, underneath Users and roles.
On the Manage users screen, use the quick filter search bar to search for the applicable user.

Click Manage User.
The Summary screen for this user will open, displaying all details, roles and any associated Admin centres or Care Facilities (if applicable).Click on the relevant blue edit field and follow the steps within the New User section above.
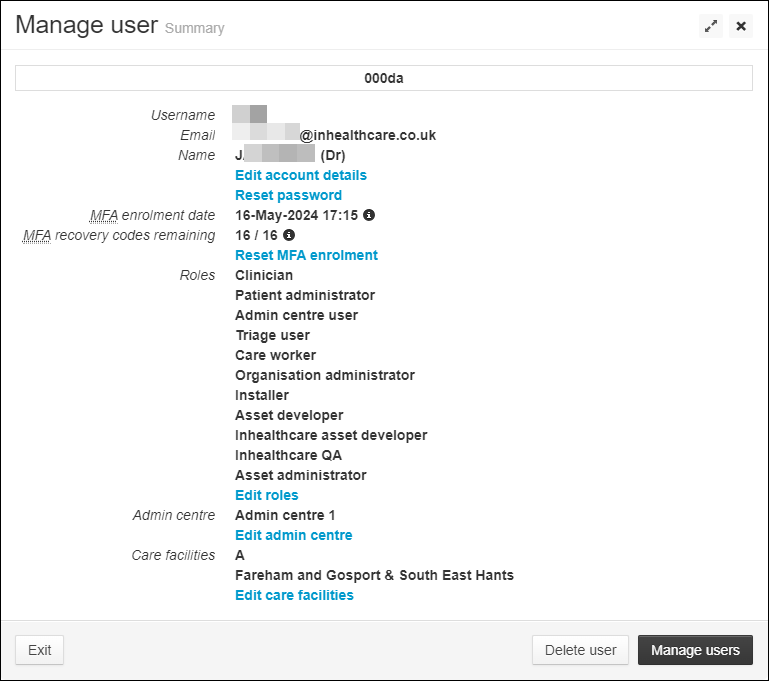
Click Finish to save any changes.
Remove User
TIP
You cannot remove or delete your own user details.
Navigate to the Organisation Administration tab.
Select Manage, underneath Users and roles.
On the Manage users screen, use the quick filter search bar to search for the applicable user.

Click Manage User.
The Summary screen for this user will open, displaying all details, roles and any associated Admin centres or Care Facilities (if applicable).Click Delete User at the bottom of the screen.
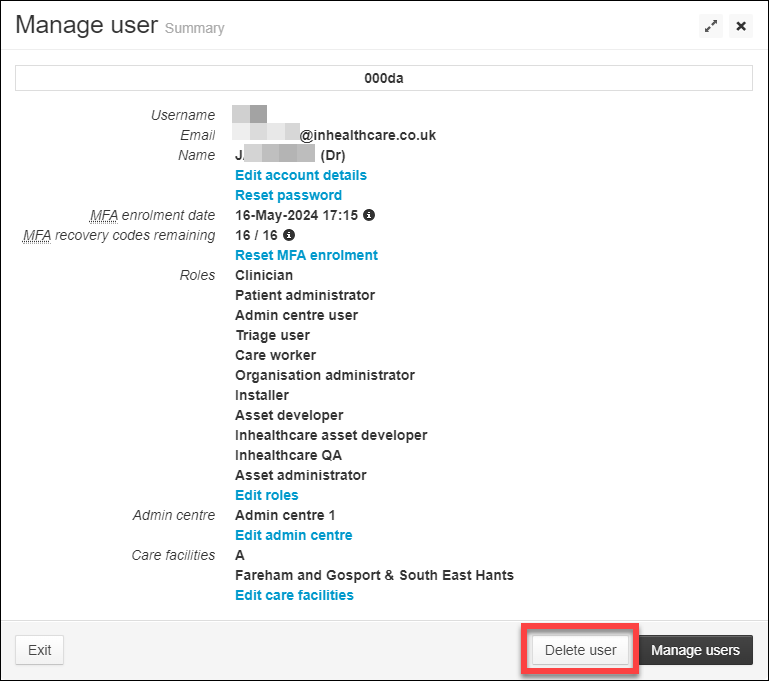
A warning will display to advise this cannot be undone.

Click Finish to save any changes.
DANGER
This action cannot be un-done, so please ensure this is the correct user that requires removing.
On the user's MFA app, their Inhealthcare account will still appear and create codes, but these codes will no longer work to access the platform.
Reset Passwords
Navigate to the Organisation Administration tab.
Select Manage, underneath Users and roles.
On the Manage users screen, use the quick filter search bar to search for the applicable user.

Click Manage User.
The Summary screen for this user will open, displaying all details, roles and any associated Admin centres or Care Facilities (if applicable).Click Reset Password.
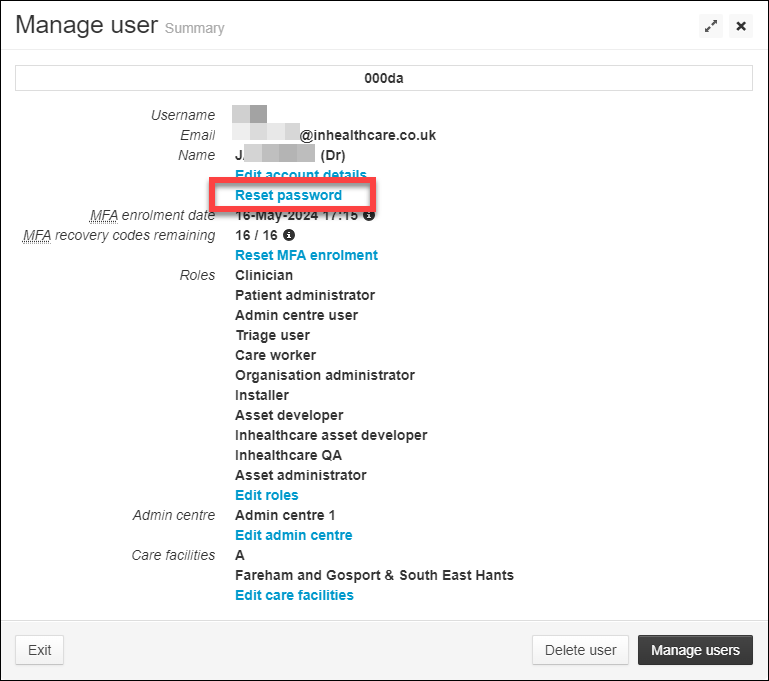
A warning will display to advise that the user's current password will no longer be valid.
 Click Finish to save any changes.
The user will receive a new link to set their password via email.
Reset MFA enrolment
For users who no longer have access to their MFA app, or have used all recovery codes associated with their MFA account.
Navigate to the Organisation Administration tab.
Select Manage, underneath Users and roles.
On the Manage users screen, use the quick filter search bar to search for the applicable user.

Click Manage User.
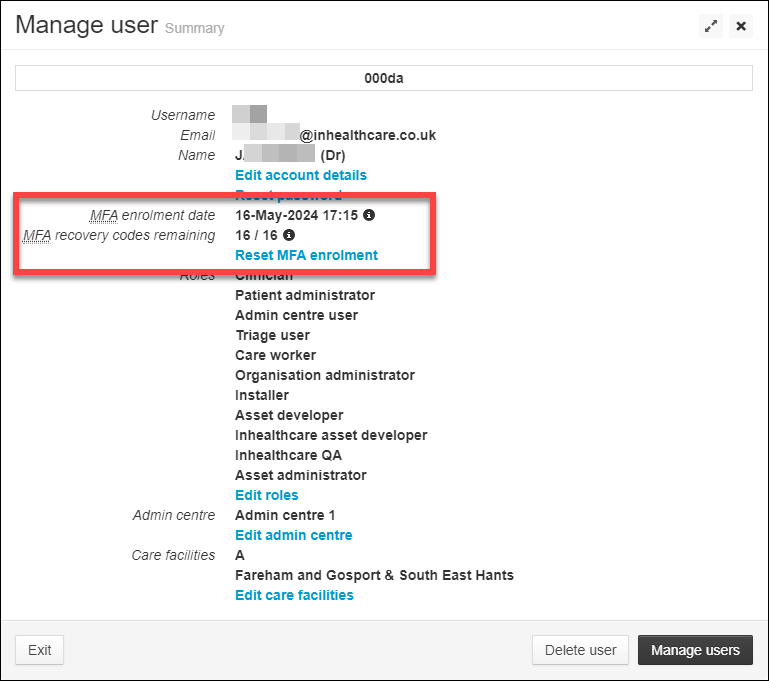
The Summary screen for this user will open, displaying all details of the users MFA status (including if they have used any of their recovery codes).Click Reset MFA enrolment.
A confirmation will display to check if you have verified the users identity, and the request to reset MFA is not a fraudulent attempt to access the platform.
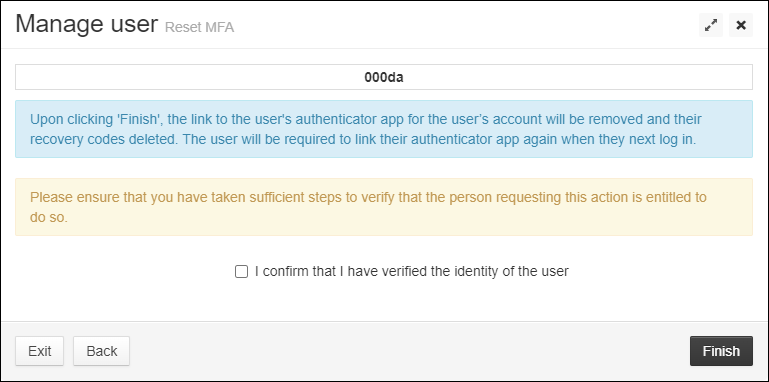 Click Finish to save any changes.
WARNING
If unsure whether to reset a user's MFA enrolment, please see the Multi Factor Authentication user guide and FAQs
Admin Centres
Admin Centres and Care Facilities may be service specific and not apply to your service.
Add Admin Centre
To add an Admin centre:
Click onto the Organisation Administration tab.

Select the Manage button, under Admin centres.
The Manage admin centres screen will open, displaying a list of all current admin centres in your organisation.Click Add Admin Centre.
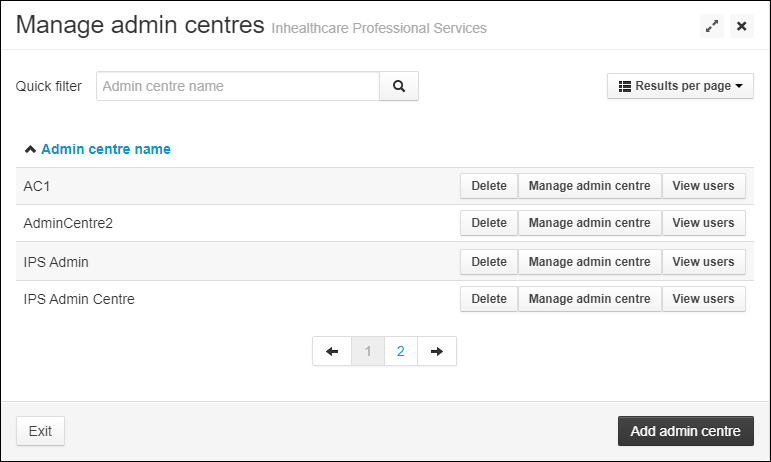
on the Admin centre details screen, enter the new admin centre details.
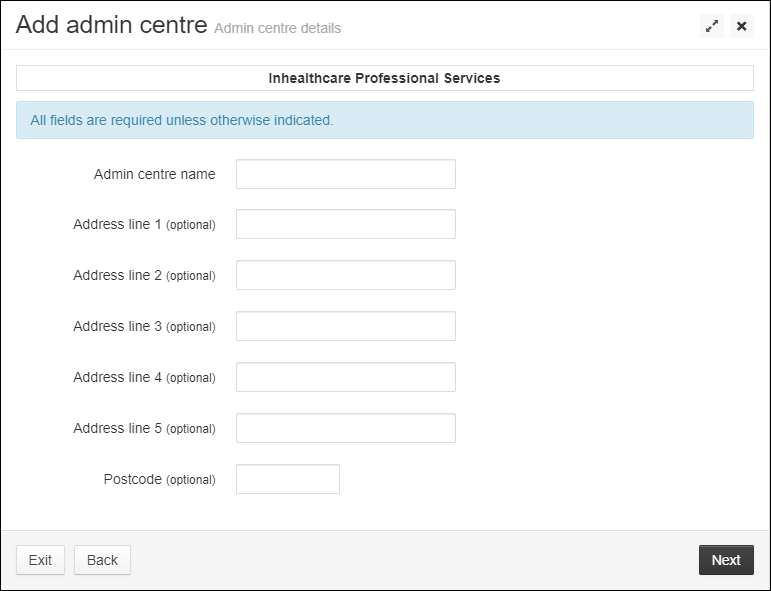
Click Next. The Review screen will show.
Click Finish to save the new Admin centre.
The success dashboard will display, click Return to dashboard.
Edit Admin Centres
Navigate to the Organisation Administration tab.
Select Manage, underneath Admin centres.
On the Manage admin centres screen, use the quick filter search bar to search for the applicable centre.

Click Manage admin centre.
The Admin centre details screen for this user will open, displaying all previous details.
Overwrite any applicable details
Click Next. The Review screen will show.
Click Finish to save the new Admin centre details.
The success dashboard will display, click Return to dashboard.
Amend User Admin Centre Access
To amend which users can access an Admin Centre, follow the steps within New User, ensuring to select the Admin centre user role to allow access to Admin centres.
Alternatively, if the user already exists, follow the steps within Edit User Details or Roles
Remove or Delete an Admin Centre
Navigate to the Organisation Administration tab.
Select Manage, underneath Admin centres.
On the Manage admin centres screen, use the quick filter search bar to search for the applicable centre.

Click Delete next to the relevant Admin Centre.
A warning will display to advise that this operation cannot be undone.
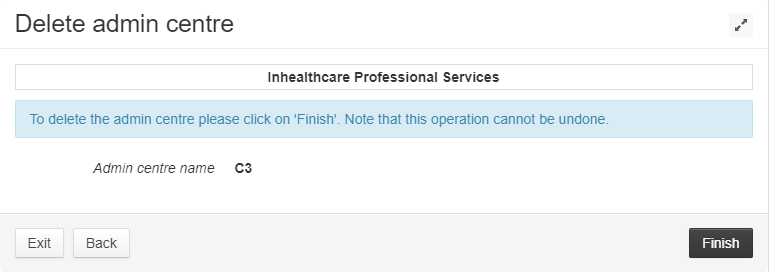 Click Finish to save any changes.
TIP
Before removing the Admin Centre, check that there are no user(s) assigned to the centre. If there are users assigned, the Admin Centre cannot be removed. Remove the Admin Centre from the user(s) assigned, this will then allow you remove the Admin Centre.
Care Facilities
Add Care Facilities
Click onto the Organisation Administration tab.

Select the Manage button, under Care facilities.
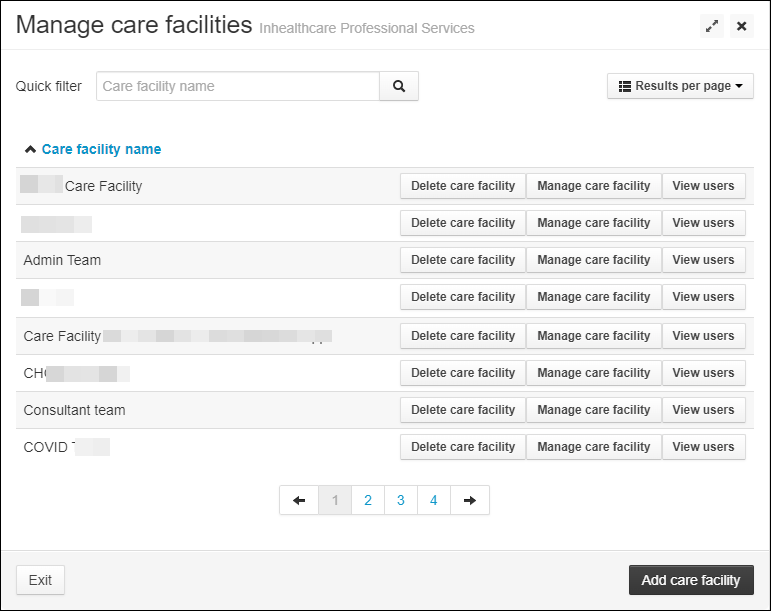
The Manage admin centres screen will open, displaying a list of all current care facilities in your organisation.Click Add Care facility.
on the Care facility details screen, enter the new Care facility details.
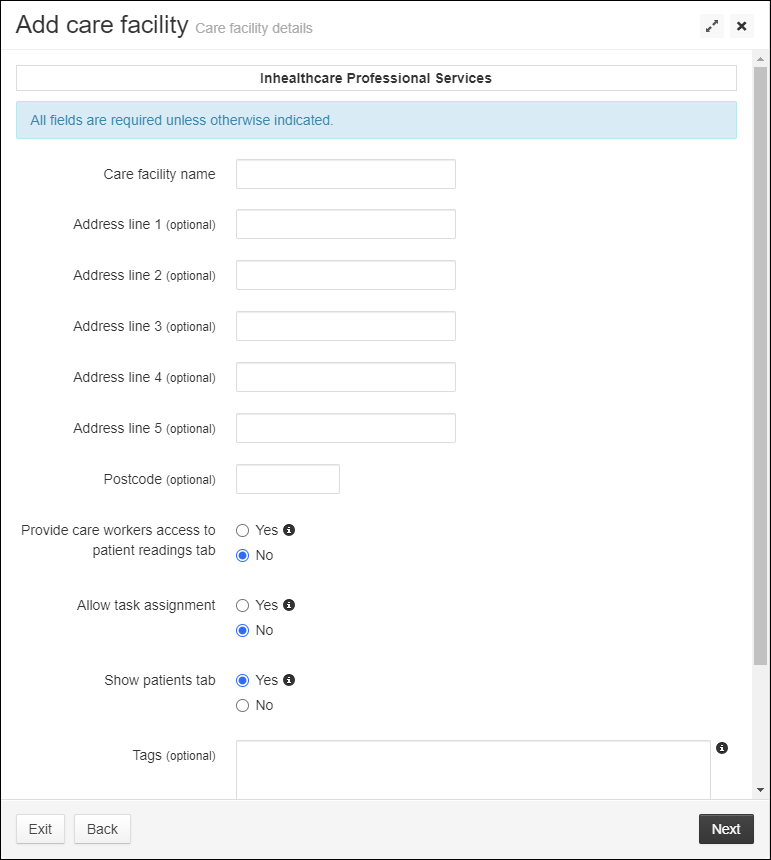
Use the applicable radio buttons to select if users should permissions to:
- Access the patient readings tab
- Allow task assignment
- Show patients tab
Click Next.
the Email preferences screen will show.Use the drop-down to set the Delivery frequency of email updates from this care facility.
Use the Configure new email template to set any email templates you need for this care facility.
Click Next.
The Review screen will show.Click Finish to save the new Care facility.
The success dashboard will display, click Return to dashboard.
Edit Care Facilities
Navigate to the Organisation Administration tab.
Select Manage, underneath Care facilities.
On the Manage care facility screen, use the quick filter search bar to search for the applicable care facility.

Click Manage care facility.
The Care facility details screen for this user will open, displaying all previous details.
Overwrite any applicable details
Click Next. The Review screen will show.
Click Finish to save the new care facility details.
The success dashboard will display, click Return to dashboard.
Amend User Care Facility Access
To amend which users can access a care facility, follow the steps within New User, ensuring to select the Care worker role to allow access to Admin centres.
Alternatively, if the user already exists, follow the steps within Edit User Details or Roles.
TIP
The users that have access to the care facility, can also be viewed in a list by:
Select the Manage button, under Care facilities
On the Manage care facilities screen, click View Users for the applicable facility.
If no users have access, it will display as 'There are no users for you to view'.
Remove Care Facilities
Navigate to the Organisation Administration tab.

Select Manage, underneath Care facilities.
On the Manage Care facility screen, use the quick filter search bar to search for the applicable centre.

Click Delete care facility next to the relevant one.
A warning will display to advise that this operation cannot be undone.
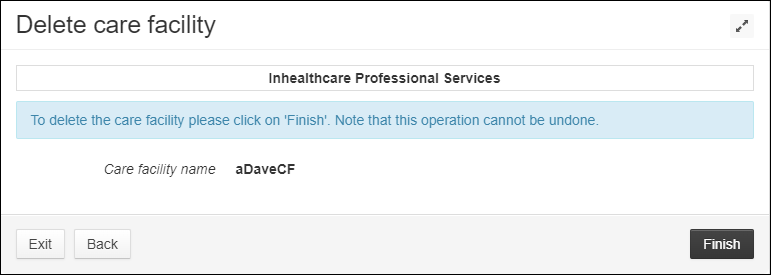 Click Finish to save any changes.