My Inhealthcare PATIENT Mobile App
This guide is not for patients
This guide is aimed at clinicians wishing to use the patient app for testing purposes, or to assist patients with getting started. This guide is not intended to be given to patients. Separate patient-facing training materials are available; please contact our Support Desk.
The My Inhealthcare App, allows for Testing from a Patients perspective. The user-friendly and simple interface, allows patients to track and submit observations when requested, dependent on the Pathway Build.
WARNING
A separate guide is available for the Inhealthcare Professional app.
How to: Install The App
Open the App Store for iPhone or go to Google Play for Android™, search for and download the My Inhealthcare app.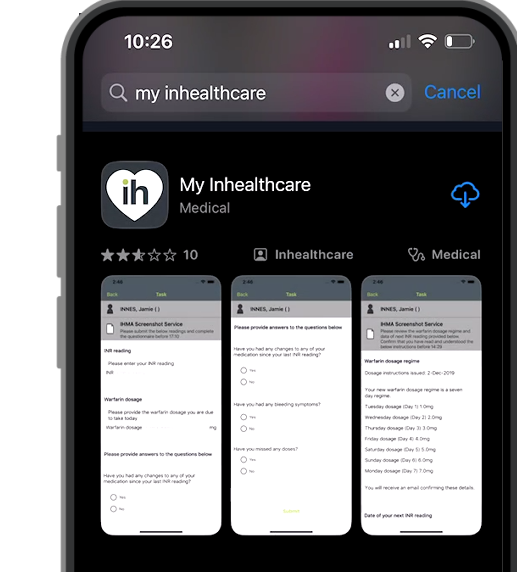
Apple, the Apple logo, iPhone and iPad are trademarks of Apple Inc., registered in the U.S. and other countries and regions. App Store is a service mark of Apple Inc.
Android, Google Play and the Google Play logo are trademarks of Google LLC.
WARNING
Please ensure this is the My Inhealthcare App and not the Inhealthcare Professional App (clinician version).
Training Mode
If wishing to use the Sandpit testing environment, you will need to enable the Training mode within the app:
To the right-hand side of the screen, select the tool symbol.

Toggle Enable training mode to on (to show as green).
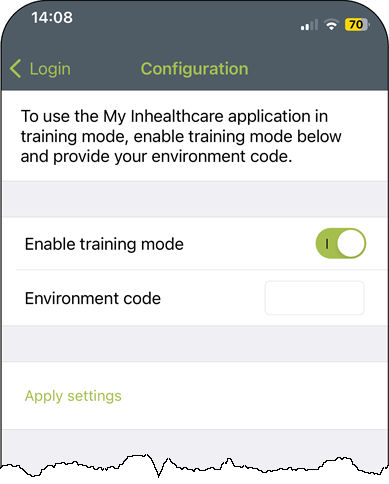
Enter Environment code c11ba05f
Click Apply settings.
TIP
The banner at the top of each screen in the app will display in red if you are in training mode.
Registration
All patients accessing the mobile app will first need to be set added to the IHC platform. There is a separate guide available for adding patients to the platform.
Once the patient has been added to the platform and enrolled onto a service, they need to be registered for online services. There is a separate guide available for How to register patients for online services (including app).
This process will allow patients to choose their own username and password which is used to log into the My Inhealthcare app.
How to: Log in
Type the patient Username and Password into the applicable fields.
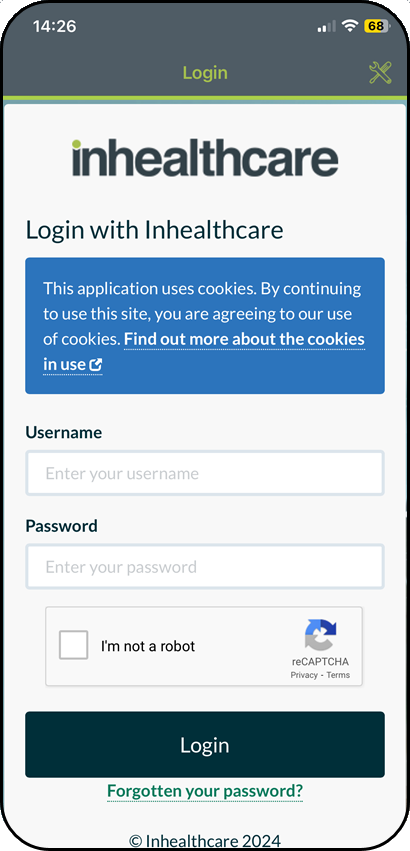
Tick the I'm not a robot box (if showing) and click Login.
TIP
The Forgotten your password? link can be used to reset your password. Clicking this will prompt for the username and will send a reset code via SMS to the mobile number held for the patient.
If no number is held or the reset is unsuccessful follow the steps within the Online Registration guide to email the patient a web link to reset their password.
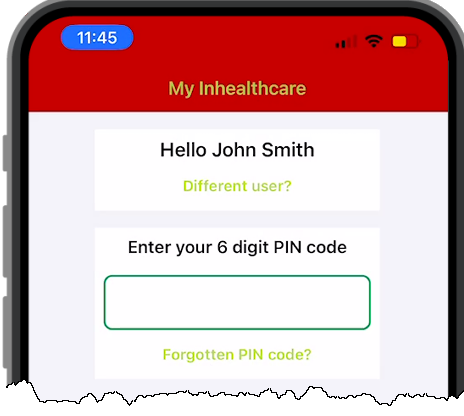
Set up PIN Code
When first logging into the app, patients will be prompted to setup a 6-digit PIN code, this will be required each time they log into the app. This is to make future logins more efficient.
To do this:
Choose and Enter your 6 digit PIN code.
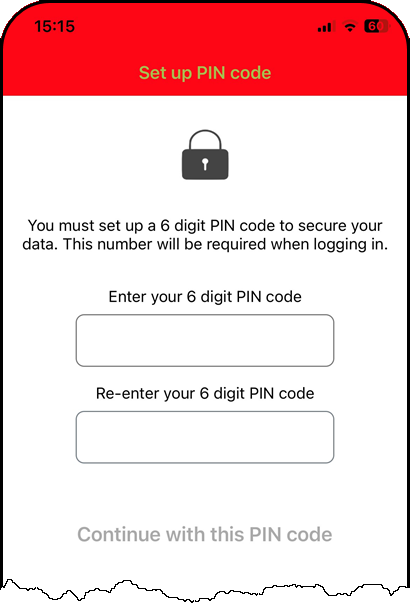
Confirm the same code in the Re-enter your PIN code field.
Click Continue with this PIN code to login.
The PIN code successfully created screen will display.
TIP
Click the Different User? text if you wish to log in as another user. E.g., if you use multiple test patients for your service.
Use the set Pin code to access the app when needed.
WARNING
If an incorrect PIN is entered 5 times in succession, all data will be wiped from the app to protect privacy. Patients would then need to re-access the app using their username and password and choose a new PIN.
Forgotten PIN Code
In the event, your 6-digit PIN code is forgotten, click Forgotten PIN code? (on the PIN prompt page). This will prompt an email to be sent to the patient's email address, which will include a link to reset the login.
How to: View a Username
Log into the IHC platform and find the Test Patient.
Click onto the Edit Patient Registration on the patient information bar.
The username (if created) will be shown on the screen.
If no username shows, click the applicable button to register the patient for online services.
App Home Screen
Once you log into the app, it will default to the Home screen. This will detail any tasks that are due.
To refresh/sync the application, drag from the top of the screen down to the bottom.
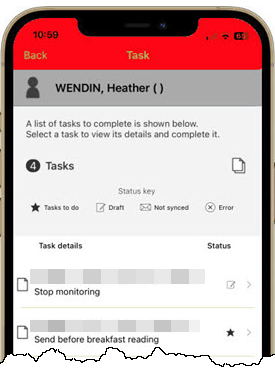
Select a task to process it according to your applicable service.
Tasks - amount of task(s) outstanding.
Status - shows detail of each status and meaning.
The following menu options may or may not be applicable to the service that the patient has been enrolled onto.
App Menu
To access the app menu, click the three horizontal lines in the top right of the screen. This will display:
- User Details - Your first name and surname.
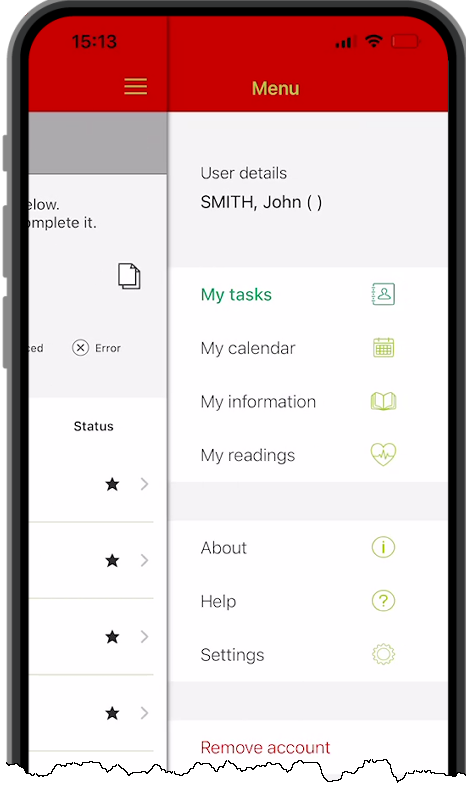
My Tasks
This section will return you back to the main screen, should you be in another section or screen of the app.
To process tasks, follow the instructions found within the user guide for your specific service/pathway.
My Calendar
This section is used to push notifications for test dates and medication reminders. This is an optional feature and notifications are required to be enabled in the app to proceed.
There are 3 options to view on the calender, these are; present day, week, or month.
Navigate to the Menu.
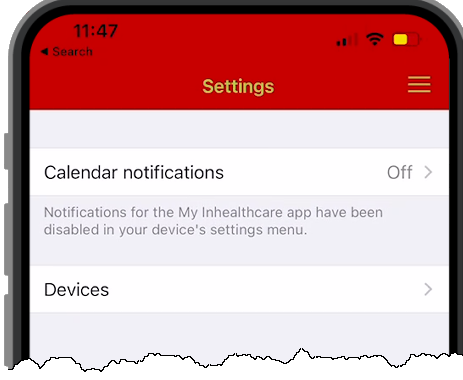
Click Settings.
Click Allow calender notifications.
Click Agree to the Consent to Store Medical Data.
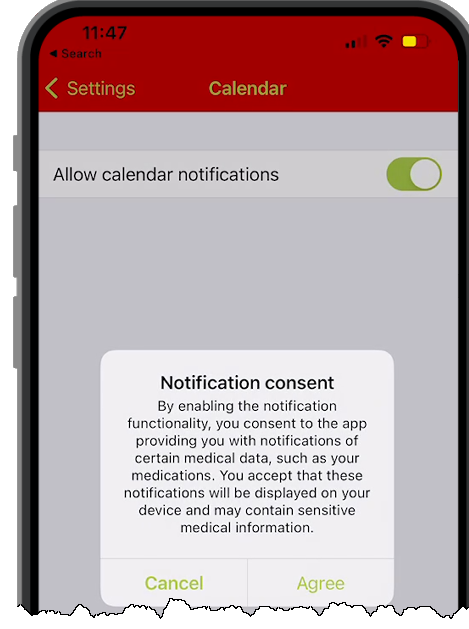
Notification Consent:
By enabling the notification functionality, the Patient consents to the app providing you with notifications of certain medical data, such as your medications. You accept that these notifications will be displayed on the device and may contain sensitive medical information.
Consent to Store Medical Data:
Before enabling calendar notifications, the Patient must consent to enabling the calendar functionality. They consent to the app being able to store certain medical data, such as your medications, so that the calendar can operate offline. They also accept that the information stored in the calendar may not always be the most recent.
My Information
This feature is used to display useful information and links to helpful websites.
My Readings
This feature is used to visually display previous and historic readings submitted into the app.
About
This section details the Terms and Conditions of the app.
Settings
This section allows to enable calender notifications, as well as the option to pair devices with the app.
TIP
If using a service with bluetooth devices, check the specific guide for that service/pathway to ensure if they need to be paired using this menu option. For example, many of our supported Microlife devices do not require additional pairing within this menu.
Remove Account
This option will remove the account and all associated data within the app. Once selected, this will return you to the login screen. This will not remove the account from the service, and you will be able to log in again with your user details if required.
Microlife Devices
Please click on the below blue linked text to view the tutorial and user guide. This will open a new browser tab.
Microlife Devices - User Guide
Microlife Devices - General Setup Tutorial
Using the Devices Manually
The tutorial linked above, is applicable for users connecting their devices via Bluetooth. If you are using manual input instead, please note that the on-screen tasks will vary. Rather than connecting the reading directly from the device, you will need to enter the reading manually through your smart device.
Compatibility Matrix
Below is the latest compatibility matrix for Inhealthcare's products and is updated as required prior to a development release.
Intended Use
The intended use of the My Inhealthcare application is to store and transmit data between patients and healthcare professionals to allow for remote monitoring of patient health without the need for face to face consultation. The purpose of the My Inhealthcare application is to allow patients to input data based on tasks specific to their chronic disease. A healthcare professional would normally collect this data during a clinical assessment. This information is entered into a form on the My Inhealthcare application and shared with the healthcare professional. The data is not altered in any way.
Results from the applications are sent to the Inhealthcare platform where clinicians set thresholds for each individual patient which will determine whether to raise an alert for review. This allows healthcare professionals to centralise their operations and only see patients/citizens/end users which require their assistance. This drives efficiency and allows staff to make an informed decision about patients and their health. Self monitoring in this manner is a positive outcome for patients who do not have to make appointments with heath care professionals and travel to clinical establishments for assessments.
The Inhealthcare software engine and My Inhealthcare patient facing App is provided as a service for patients by providers such as the NHS. Customers / Providers utilise the Inhealthcare Platform to develop pathways which are deployed in healthcare settings. The customer / provider is responsible for the governance elements of the pathways developed, including testing prior to release. Inhealthcare provide a sand pit platform to support testing of any pathways that are developed prior to deployment.
The My Inhealthcare application was initially developed following a requirement to allow patients to enter information on the move. Prior to this development patients were confined to using automated phone calls or an online portal to enter data to be shared with their healthcare professional. The My Inhealthcare application allowed patients to be able to send information using their smartphones whilst on the move and outside of their own homes.
Feedback from patients using Inhealthcare’s digital health services confirmed that many of them travelled due to work comittments and wanted the flexibility to receive information whilst on the move on their smartphone. Core Functionality: The core functionality of the My Inhealthcare application is to present to an individual a form in which they enter information about themselves and responses to questionnaires. Based upon the responses and data that the individual enters they may receive additional questions or be presented with additional information. The forms that the user completes are saved on the application and once completed are sent from the application to the central Inhealthcare platform where they are made available to healthcare professionals.
Scope
The scope of use for the My Inhealthcare application is for patients or carers to enter personal non-urgent clinical information into forms from the convenience of their own home or whilst mobile and for this information to then be shared with healthcare professionals accessing the information via the Inhealthcare platform. Clinically critical data is out of scope for this application.
Target Population for My Inhealthcare App
The target population for the My Inhealthcare App are patients who receive care from healthcare organisations within the UK. They have long term conditions such as Chronic Obstructive Pulmonary Disease (COPD), Heart Failure and Diabetes but are otherwise healthy individuals and have no requirement for constant medical care in a hospital or nurse led facility. They require to share information on a regular basis with healthcare professionals and want to avoid unnecessary journeys to see their healthcare professional.
End user for the My Inhealthcare App
Citizens/patients with chronic diseases being monitored by providers using the Inhealthcare solution.
Provider
Healthcare workers/organisations supporting the individual. This may be classified as a Local Authority, Health & Social Care Partnership, CCG. There are no specific patient / user exclusions within the privacy policy for the applications. Each healthcare organisation may have their own exclusion criteria for patients.