Planning Your Vaccination Programme
Creating School/Clinic sessions
Before patients can begin to be processed on this service, programmes, sessions and locations need to be set up and configured.
WARNING
Only a member of the Planning team can set up sessions for immunisations and alter the configuration of the service.
To configure your service:
Log into the IHC portal.
Further help available
There is a separate guide available to help clinicians get started with the IHC Portal.
Click Care facility.
On the left-hand menu, click System setup.
The different ways to configure the service will be displayed in tabs.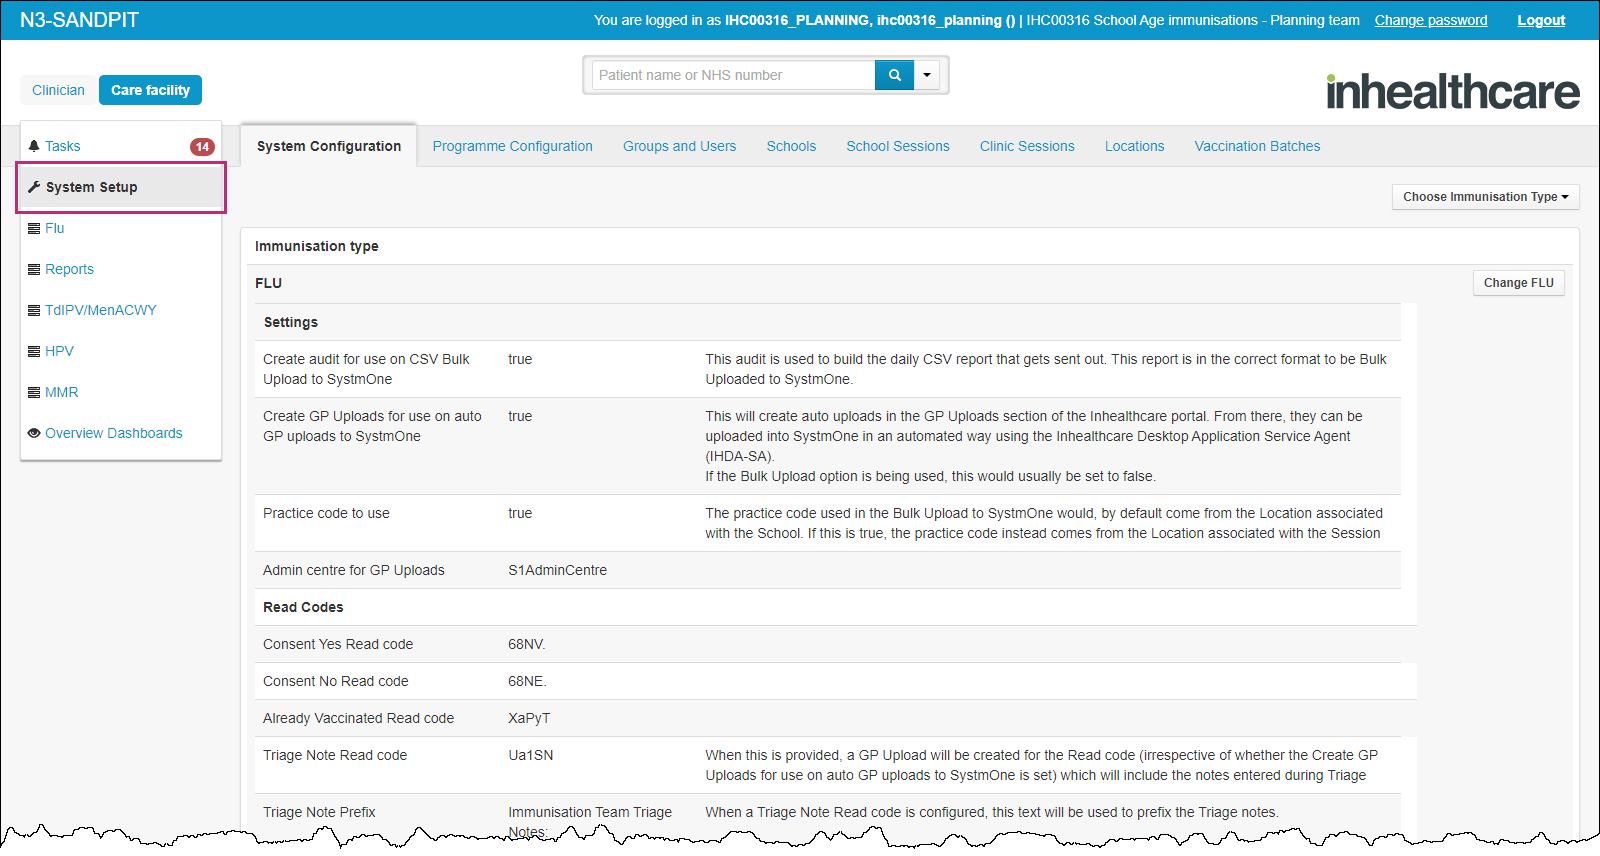
System Configuration
All Immunisation types will show on this dashboard. Users can scroll down to view details of each different vaccination, or they can use the Choose Immunisation Type filter button at the top of the screen to show one vaccine at a time.
Information for each vaccine will include the following (if applicable per vaccine):
Settings - including the settings for auto uploading to the patient's GP system.
Read Codes - any associated Read codes which need passing to the GP system.
Vaccinations - details of the different possible vaccine types, e.g. drug name and dose.
Changing your System Configuration
If details need to be changed: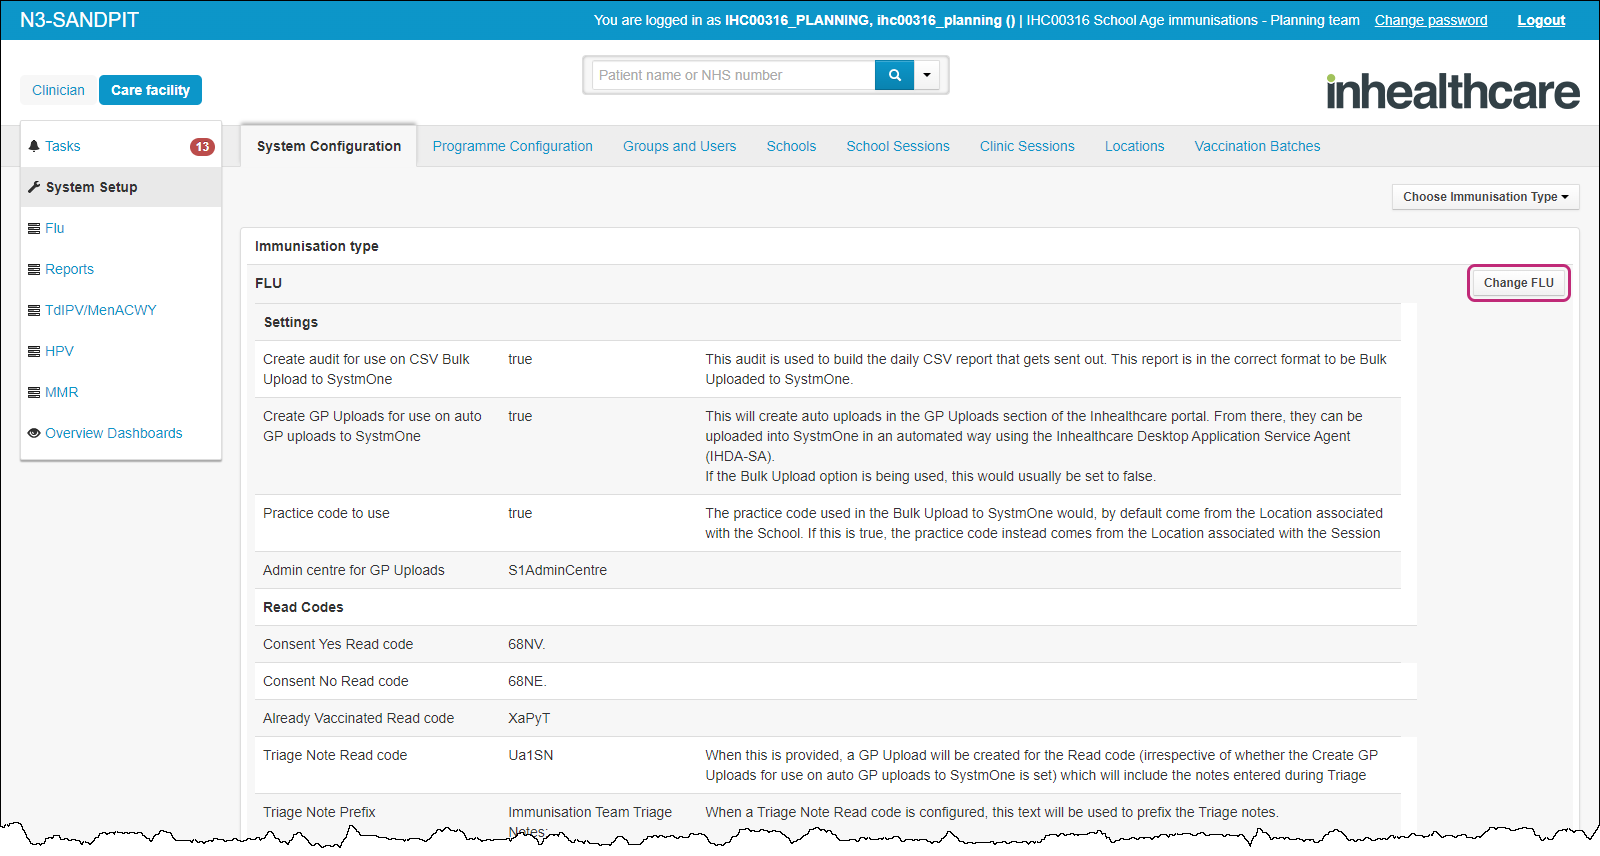
For the applicable vaccination, click the Change button, which can be found in the top right of each vaccine type.
On the Settings screen, confirm the following:
- Create audit to coded entry? - tick for this to be true.
- Send to SystmOne via GP Uploads? - tick for this to be true.
- Use the location id from the session (not the school) for audit? - tick for this to be true.
- GP Uploads admin team - select the applicable team from the drop-down.
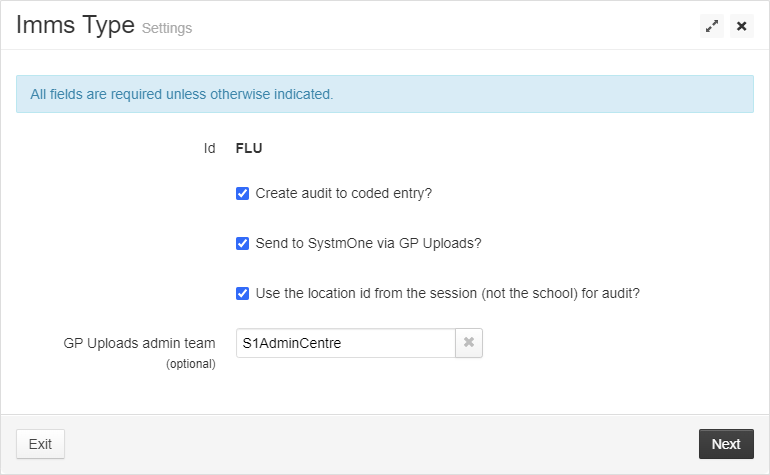
Click Next.
On the Read codes screen, confirm the applicable read codes for the various outcomes of the vaccination appointment.
Fields marked (optional) can be left blank. All other fields mus be completed before you can continue.Click Next.
On the Vaccinations screen, confirm the following:
- Drug name - dependant on the vaccine type, there may be additional fields for alternative drug names available (e.g. injection or nasal for Flu vaccine)
- Drug part - an additional field for second dose may also display, depending on the vaccination type (e.g. HPV may need second dose)
- Dose - Injection
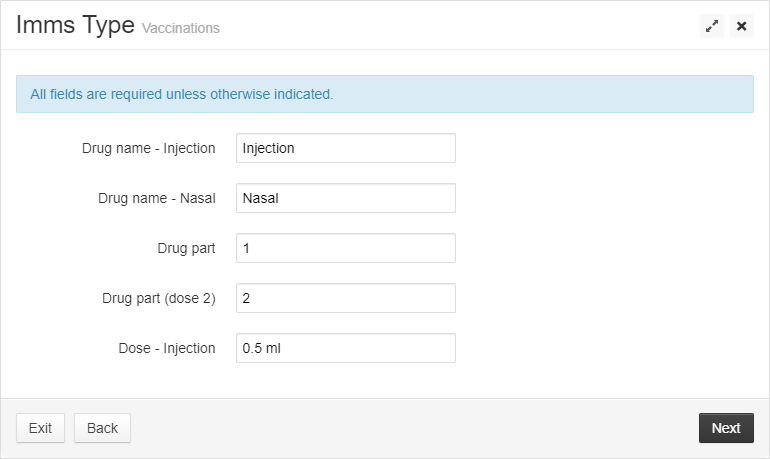
Click Next followed by Finish to save your changes.
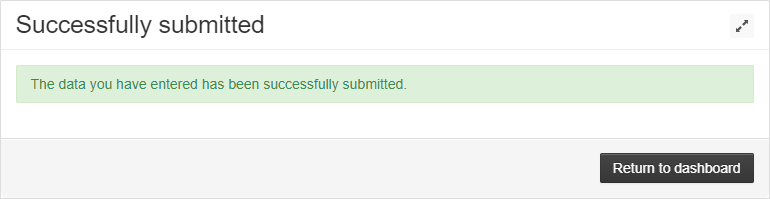
A confirmation will be shown, click Return to dashboard.
Programme Configuration
All programmes for each immunisation type will show on this dashboard. Users can scroll down to view details of each different programme, or they can use the Choose Programme filter button at the top of the screen to show one programme at a time.
The list of programmes can be also filtered using the Select Status dropdown, in the top right of the dashboard, to show:
- All
- Active
- Deleted
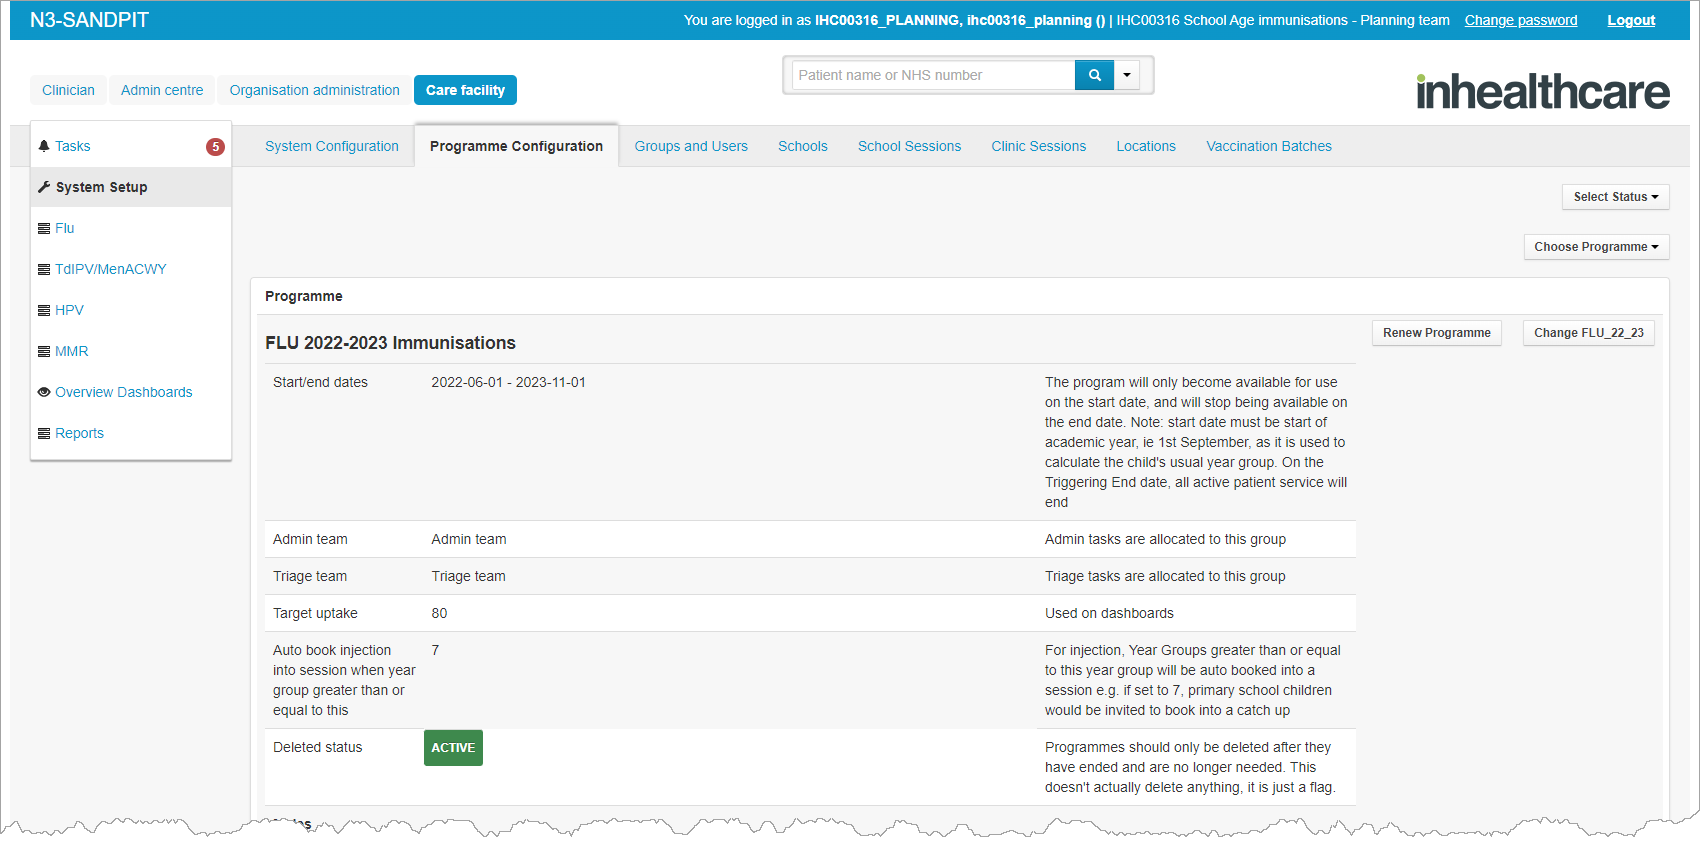
Information for each vaccine programme will include the following (if applicable per vaccine):
General information - including the start and end dates for the programme, teams assigned and whether primary children should be sent to a catch-up clinic for injected vaccines (e.g. if objecting to the nasal flu vaccination). The Deleted status shown within this section will display a colour-coded tag.
Males/Females - separate sections for each gender to set parameters for age/year group of the patients eligible. Date of birth is used to ensure that all children within the academic year(s) are captured, it is recommended that the range begins with 1st September and ends 31st August of the applicable birth years.
Special schools - this section will overrule the Male and Female sections as often special schools will include children with additional medical needs, or additional year groups (up to Year 14+), therefore different parameters are needed.
Consent form text - here you can view the text that shows for the:
- Eligibility message - if the child's date of birth falls outside of the eligibility range.
- GDPR text - a legal requirement when collecting any personal information, this will be shown on the confirmation page during consent.
- Service url text - the web link for further information used on the initial consent page.
Email text - here you can specify the text that shows within emails sent following the completion of an enrolment form, whether consent was given or not.
Vaccine specific - similarly to the email text, here you can configure the wording for emails regarding specifics of this type of vaccine. E.g. Flu may require more than one dose, especially if the child is immunocompromised and therefore further emails will be sent to recall patients for a second (or third) dose.
Creating a New Programme
Clicking the Renew Programme button on a programme will create a copy: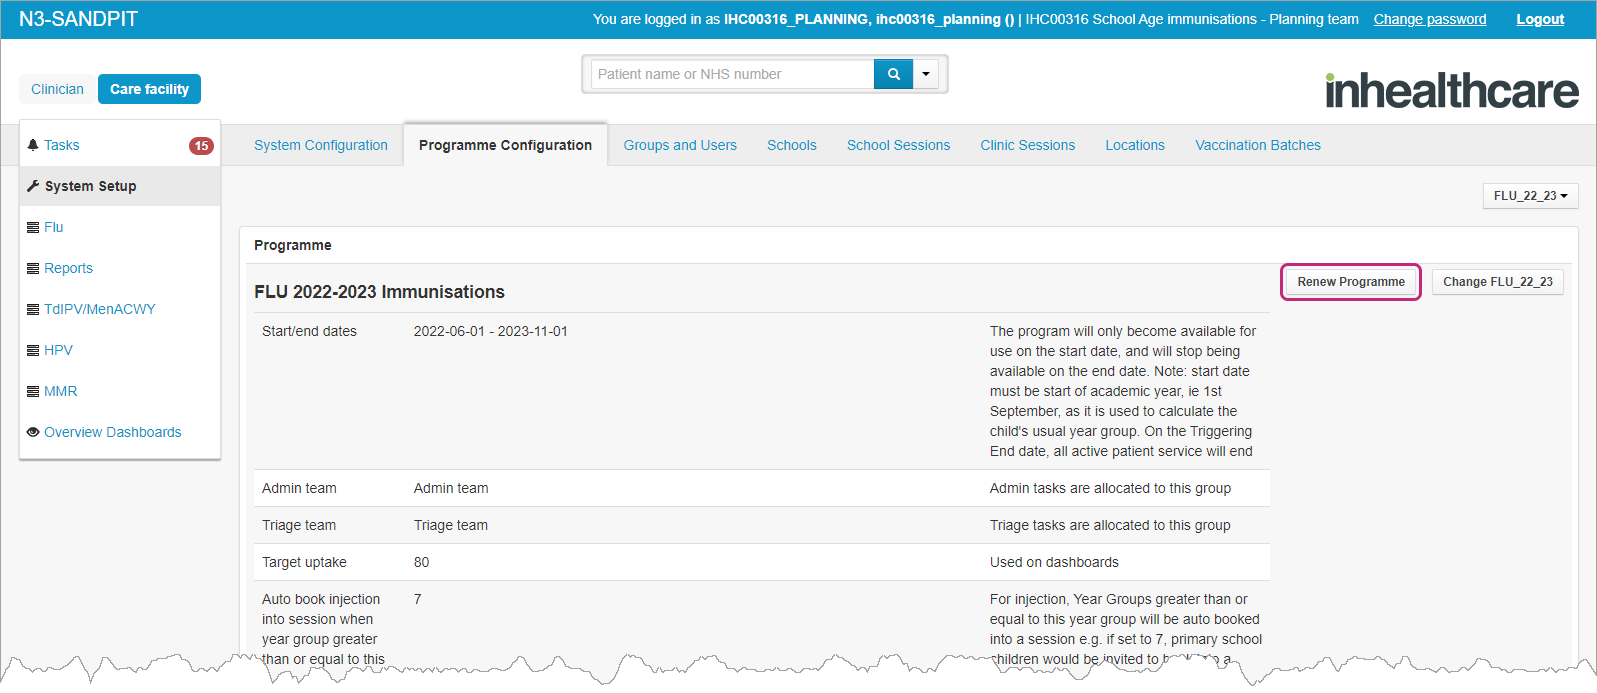
Click Renew Programme.
The Program Type screen will open.Select the programme you wish to copy from the drop-down.
Click Next.
A confirmation of the programme you wish to copy will display.
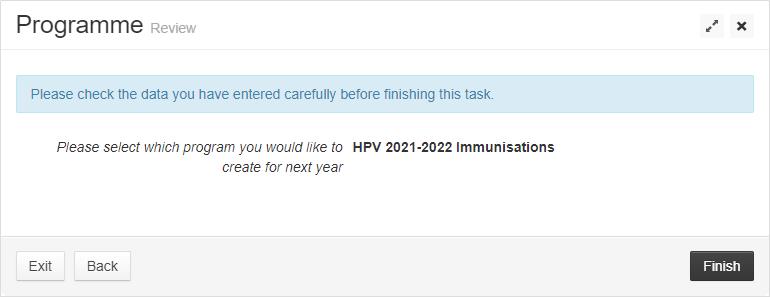
Click Finish to confirm and save the new programme.A confirmation wil be shown, click Return to dashboard.
Changing a Programme
Once the new programme appears, it can be changed by:
Click Change.
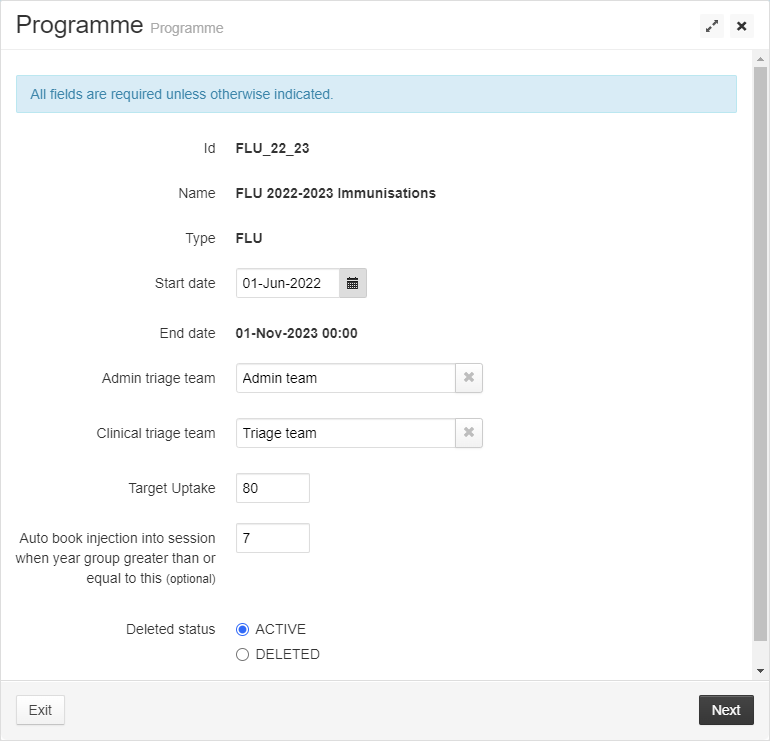
On the Programme screen you can amend the following:
- Start date - use the calendar to select.
TIP
The End date cannot be changed by users. If the end date of your programme needs amending, please contact the IHC support team.
- Admin triage team - choose from the dropdown. This dropdown is populated by the information within the groups and users tab.
- Clinical triage team - choose from the dropdown. This dropdown is populated by the information within the groups and users tab.
- Target Uptake
- Auto book injection into session when year group greater than or equal to this - patients in year groups lower than the number entered into this field will be directed to book a clinic session for vaccinations administered by injection. This field is optional; if it is left blank, all injected vaccines will be referred to book a clinic session. If 0 is entered, injection vaccinations will not be directed to a clinic.
- Deleted status - choose between Active and Deleted. Deleted schools will still be shown, but cannot be assigned to sessions.
Click Next.
On the Male screen you can amend the following:
- Date of birth start range - it is recommended that the date and month begin 1st September so as to capture all birthdays within that school year.
- Date of birth end range - it is recommended that the date and month begin 31st August so as to capture all birthdays within that school year.
- Commissioned school years - select the applicable, more than one group can be selected.
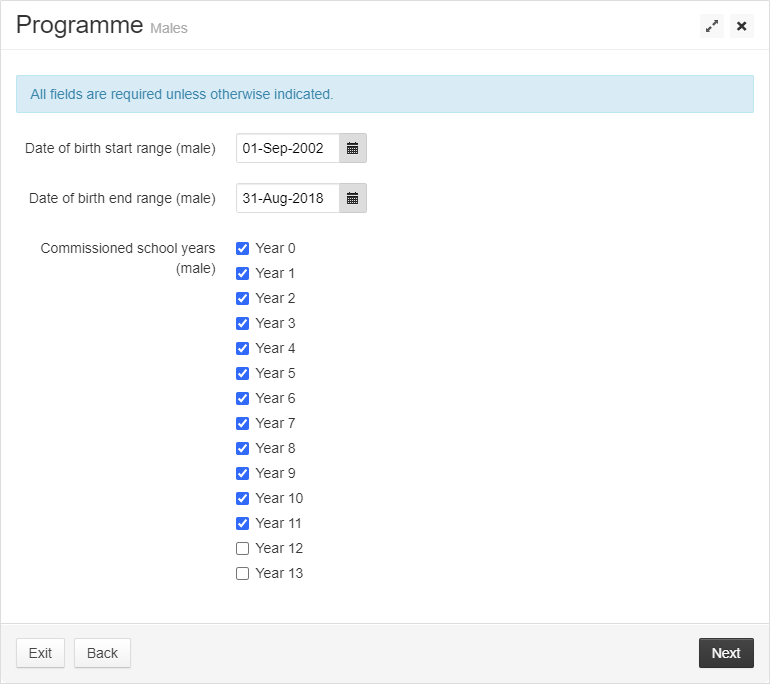
Click Next.
On the Female screen you can amend the following:
- Date of birth start range - it is recommended that the date and month begin 1st September so as to capture all birthdays within that school year.
- Date of birth end range - it is recommended that the date and month begin 31st August so as to capture all birthdays within that school year.
- Commissioned school years - select the applicable, more than one group can be selected.
Click Next.
On the Special Schools screen you can amend the following:
- Date of birth start range - it is recommended that the date and month begin 1st September so as to capture all birthdays within that school year.
- Date of birth end range - it is recommended that the date and month begin 31st August so as to capture all birthdays within that school year.
- Commissioned school years - select the applicable, more than one group can be selected.
Click Next.
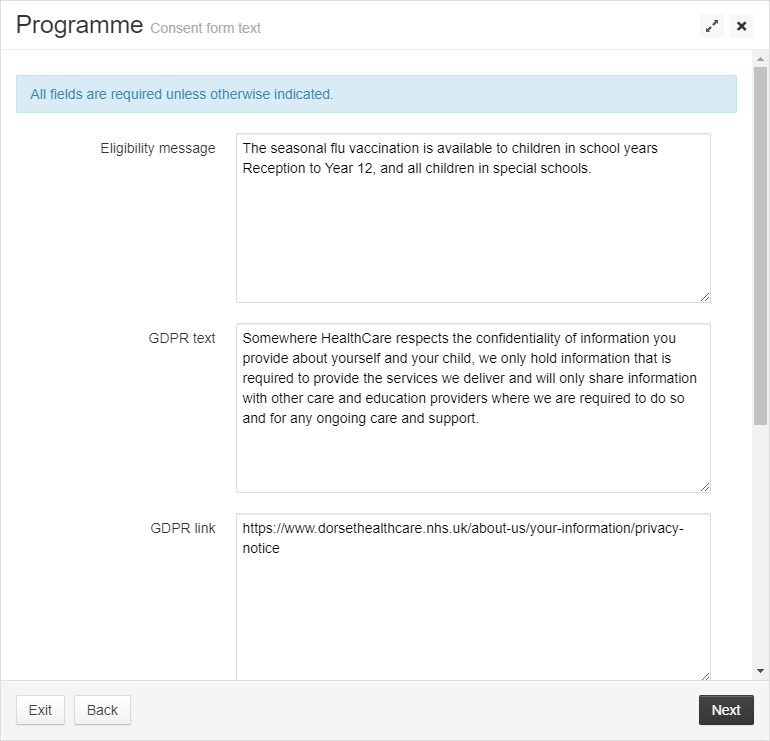
On the Consent form text screen you can amend the following:
- Eligibility message - if the child's date of birth falls outside of the eligibility range this text will show.
- GDPR text - a legal requirement when collecting any personal information, this will be shown on the confirmation page during consent.
- GDPR link - the web link for further information on GDPR policy.
- GDPR link text - the text to click on to access the GDPR link.
- Service url - the web link for further information used on the initial consent page.
On the Email text screen you can amend the following:
- Signature text - this will be used as the 'sign off' for emails sent from this programme.
- Enquiries text - this will be included at the end of all emails and is recommended to include a link or contact for any enquiries to be directed to.
- Clinic locations text - this should include any information about where the clinic is located.
- Additional info text - text to be used within the email to provide any additional details about the session.
- Consent NA info - text to be used within the email sent to people who do not need to be vaccinated through this programme (e.g. they have already been immunised).
- Consent not given info - text to be used within the email sent to people who do not consent for their child to be vaccinated.
- Choose catch up info - text to be used within the email sent to people who's child has missed their vaccination, and so a 'catch up' session is needed.
- End of program message - text to be used within the email sent once the programme has finished. This will be sent to patients who should have been vaccinated but did not attend a school session/clinic in time.
- Further options - dependant on the vaccination, further fields may appear for emails regarding additional doses.

Click Next.
The Review screen will show.Click Finish to save your changes.
A confirmation will be shown, click Return to dashboard.
Groups and Users
All users within your organisation will be listed here, showing the groups they have permission to access.
Groups that are tagged as a school will show a blue school marker against them.
Some users may have access to multiple groups.
The Select User drop-down allows you to filter the view to a specific user.
Schools
A list of school names and their IDs will be displayed here. A summary of which year groups have been configured for each school will also be displayed, as well as if access to the School access dashboards are available for school users.
The list of schools can be filtered using the Select filter dropdown, in the top right of the dashboard, to show:
- All
- Active
- Deleted
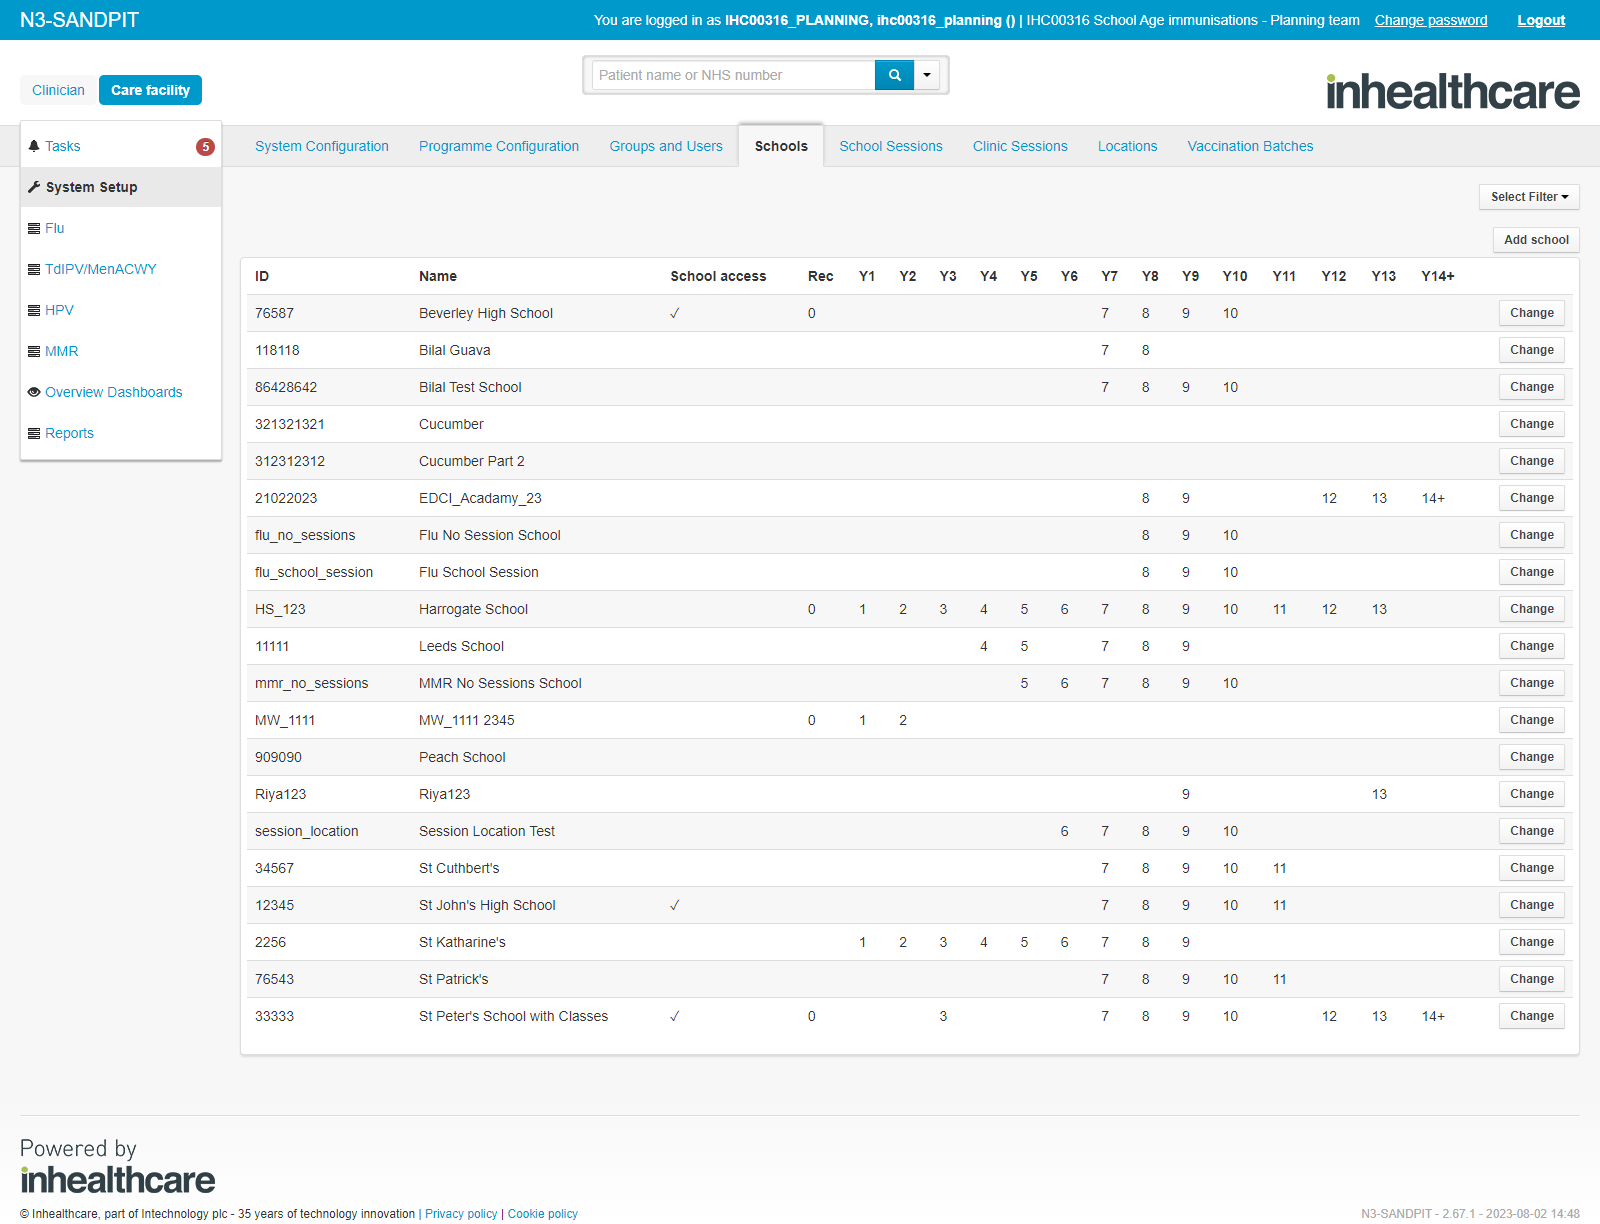
Adding a New School
New schools can be added by:
Click the Add school button.
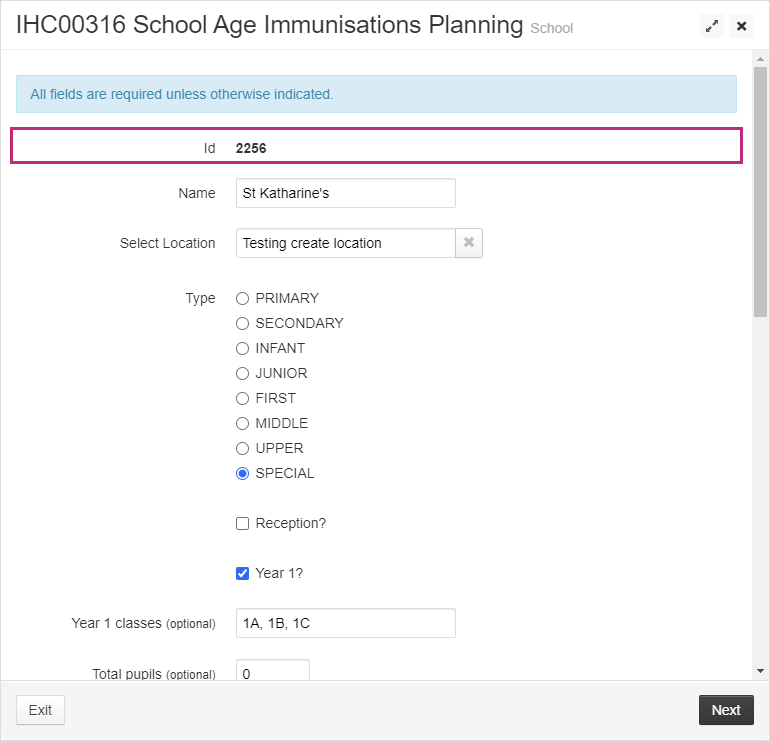
On the School screen, complete the following fields:
ID - this needs to be a unique code for the school you are creating.
Select Location - choose the correct location from the drop-down. This dropdown is populated by the information within the Locations tab.
Type - choose the type of school. Tick boxes are also available to select the year groups applicable to this school.
When a year group is selected, additional optional fields will appear for you to enter:TIP
If Year 14+ is needed for your flu programme school sessions, Special school should be the type selected to reveal that option.
- Classes - if more than one class is being added, separate these with a comma e.g 1A, 1B, 1C
- Total pupils - the maximum number of pupils that can be assigned to this year group.
- Total male - the maximum number of male pupils that can be assigned to this year group.
- Total female - - the maximum number of female pupils that can be assigned to this year group.
School team (optional) - if you want to allow school-based users on the IHC platform access to the School access dashboards select the applicable organisation from this dropdown.
TIP
The school team needs to have been set up correctly as a Care facility within your organisation. Check with your organisation administrator.
Deleted status - choose between Active and Deleted. Deleted schools will still be shown, but cannot be assigned to sessions.

TIP
If, at the time of deployment, your organisation has selected that classes are applicable for enrolment forms for this service, at least one class should be entered into the optional field under type.
Click Next.
The Review screen will show.Click Finish to save your changes.
A confirmation will be shown, click Return to dashboard.
Changing a School
To view or change the specific details for each school:
Click the Change button for the applicable school.
Follow the steps above for adding a school.
TIP
The school ID cannot be changed, but the name can. If you are using a new unique reference number, this should be set up as a new school.
School Sessions
All school sessions will show on this dashboard.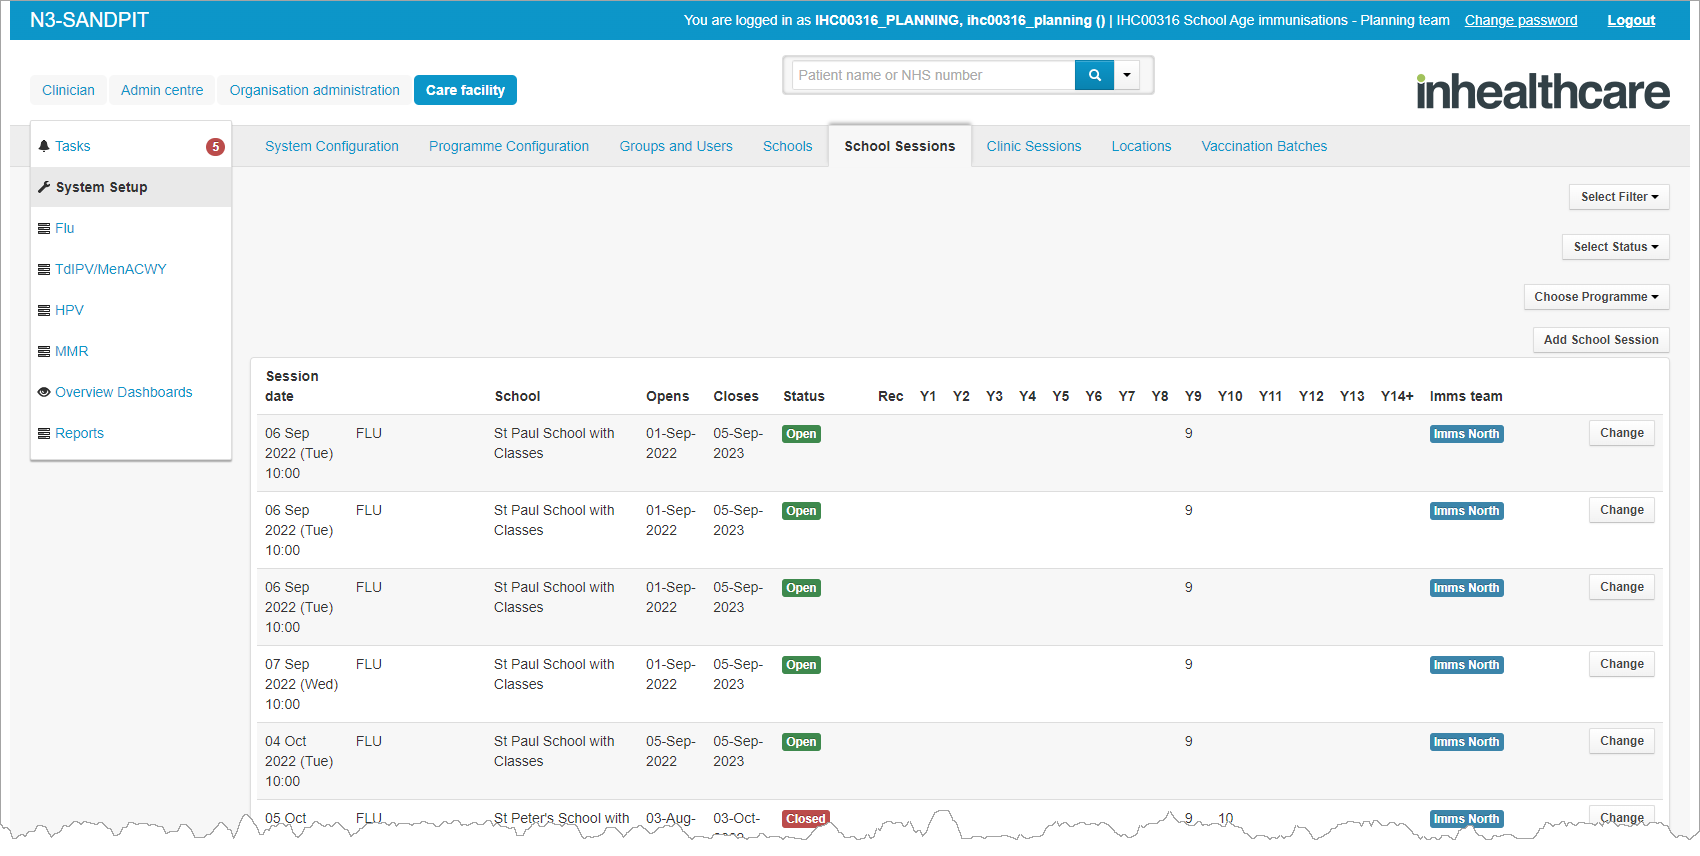
Information shown can be filtered using the dropdown options at the top right of the dashboard:
Select Filter - This will allow you to filter to All sessions or Future sessions.
Select Status - This will allow you to filter between All, Active and Deleted.
Choose Programme - This will allow you to filter between the different vaccinations or display all.
The dashboard will display all sessions in order of their date. The Session date is when the appointments will take place. The type of immunisation will be displayed along with the school.
If the enrolment form is filled out on a date which falls on or between the opens and closes dates shown, the patient will be assigned to this session date, if there is a slot available.
The status shown refers to whether enrolment forms can still be submitted for a session, not whether the session date has passed.
TIP
A session date will always take place after the closing date.
The Select Filter dropdown allows users to view all sessions or future sessions.
Adding a School Session
To add a school session:
Click Add school session
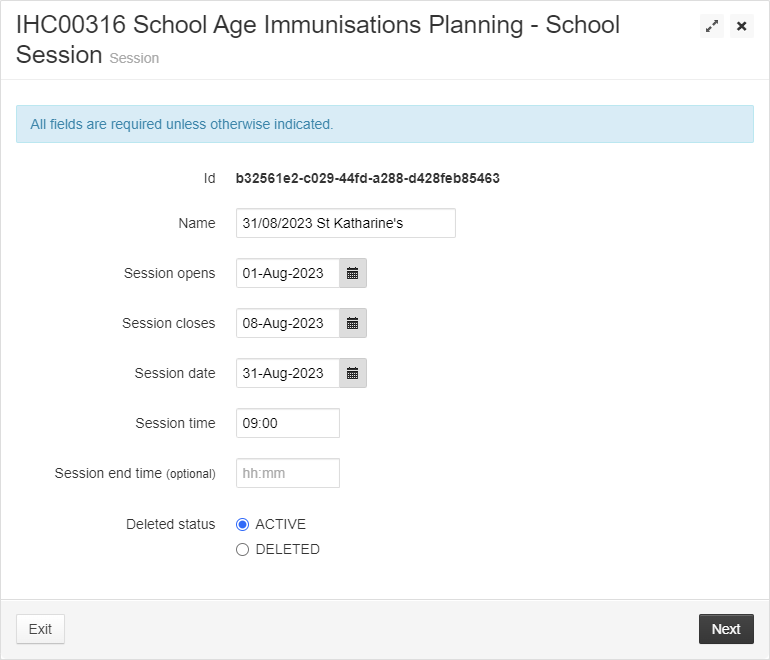
On the School Session screen, complete the following fields:
- Program - choose the applicable programme from the drop-down. This dropdown is populated by the information within the Programme Configuration tab.
WARNING
Do not use past programmes to create a your new session.
- Use default name - it is recommended that the Use default name option is ticked as this will auto-populate the name of the session with important details; including the date and location of the session. If this is not ticked, an additional Name field will appear.
- Session opens - the date from which enrolment forms can be completed to book onto this session.
- Session closes - the date from which enrolment forms can no longer be completed to book onto this session. This should be a date on or after after the session opens date.
- Session date - the date the session will take place. This should be a date on or after after the session closes date.
- Session time - the time the session will take place.
- Session end time - an optional field to specify an end time for the session.
- Deleted status - choose between Active and Deleted. Deleted school sessions will still be shown, but will not allow any bookings.
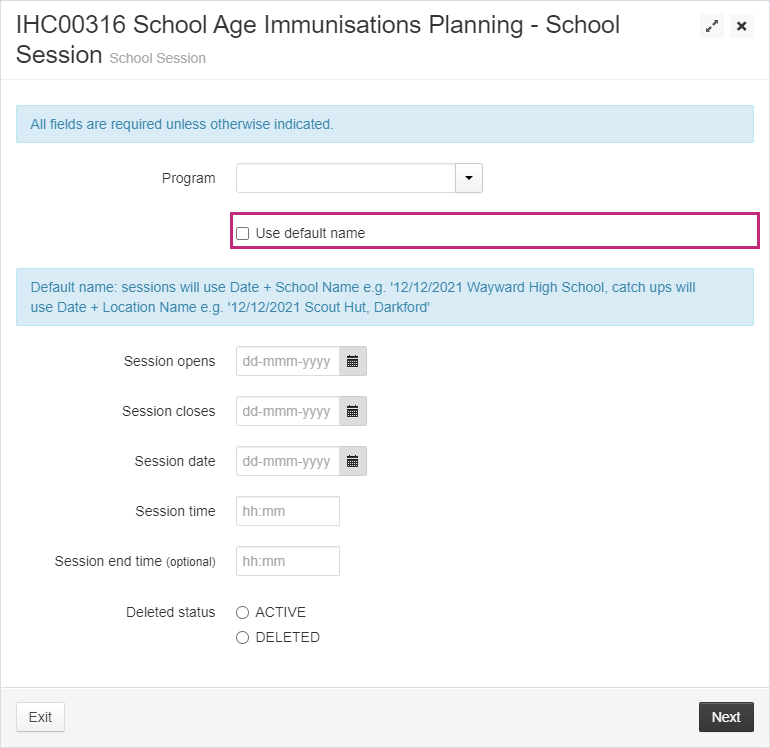
Click Next.
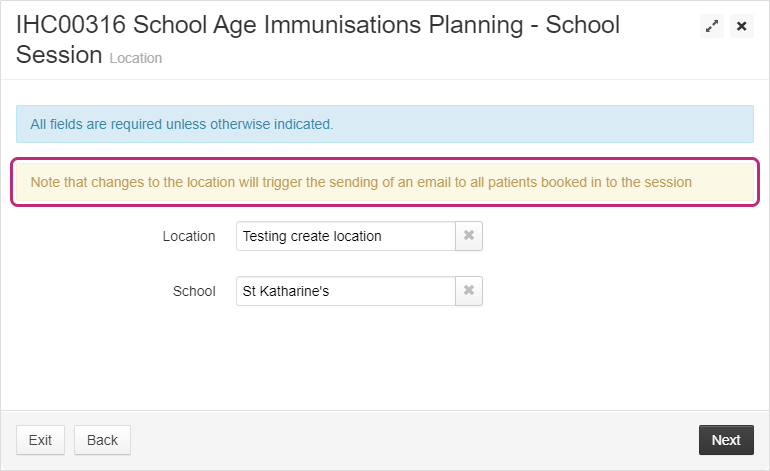
On the Location screen, complete the following fields:
- Location - choose the applicable Location from the drop-down. This dropdown is populated by the information within the Locations tab.
- School - choose the applicable Location from the drop-down. This dropdown is populated by the information within the Schools tab.
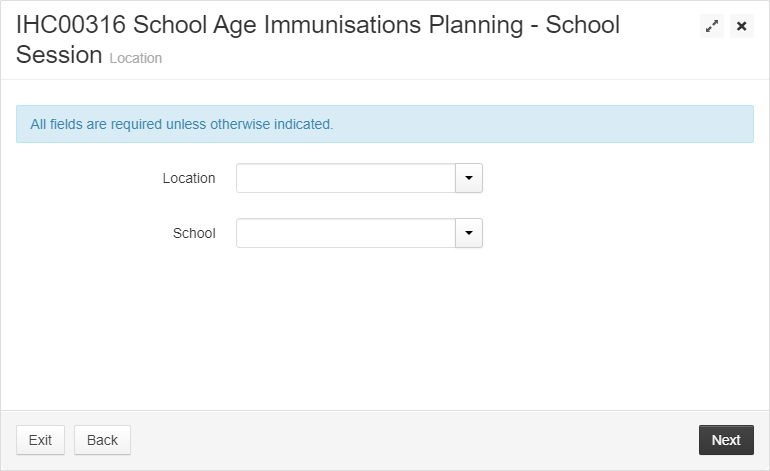
Click Next.
The Review screen will show.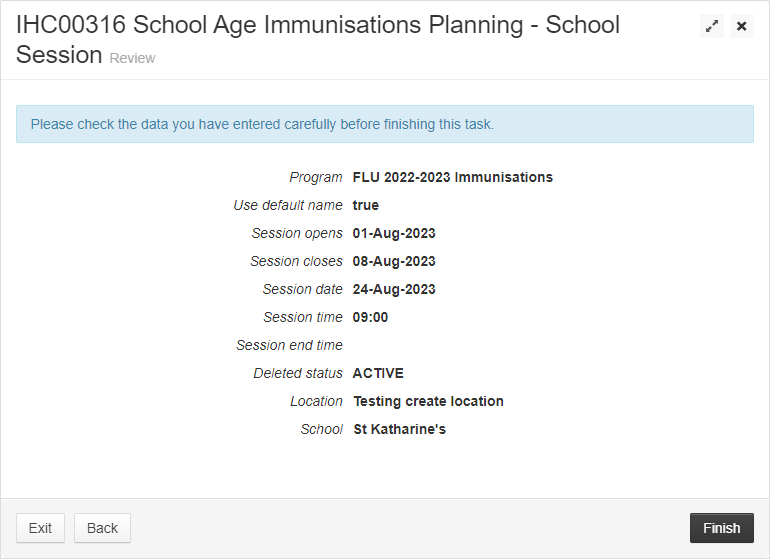
Click Finish.
The Years screen will show.Confirm which school years are included within this session by using the Yes/No radio buttons.
TIP
If Year 14+ is needed for your flu programme school sessions, Special school should be the type selected when the school was added/amended on the Schools Dashboard.
Click Next.
On the Immunisation team screen, select an Immunisation team using the drop-down.
The following optional fields can also be amended:- On the day admin team - select from the drop-down. This team are an optional additional team who can mark the attendance of patients for the session.
- On the day clinical team - select from the drop-down. This team can take attendance just like the On the day admin team but they are clinically trained and can make clinical decisions as to whether the child can or cannot have the vaccine.
- Pharmacy - select from the drop-down.
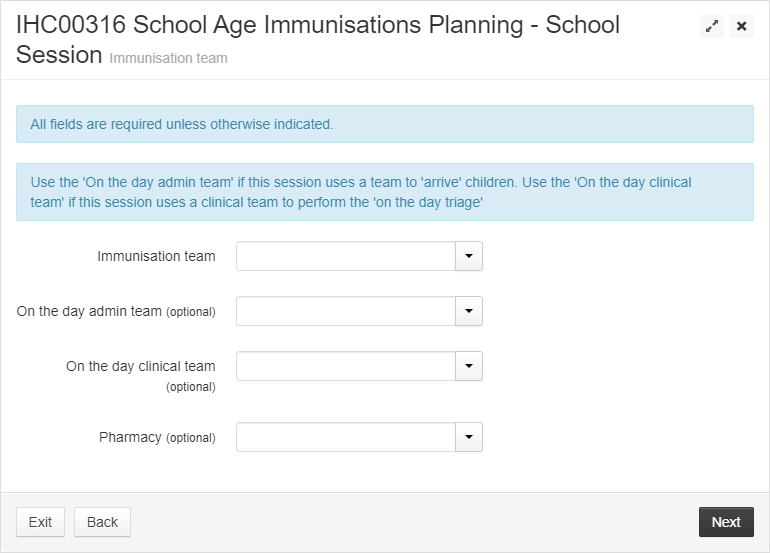
WARNING
If the on the day teams are not configured here, tasks for these teams will not appear for any patients assigned to these sessions.
Click Next.
The Review screen will show.Click Finish.
A confirmation will be shown, click Return to dashboard.
Changing a School Session
Sessions which have not taken place can be amended by:
Click Change on the applicable session.
On the Session screen, complete the following fields:
- Name - it is recommended that you keep this in the same format of date, school.
- Session opens - the date from which enrolment forms can be completed to book onto this session.
- Session closes - the date from which enrolment forms can no longer be completed to book onto this session. This should be a date on or after after the session opens date.
- Session date - the date the session will take place. This should be a date on or after after the session closes date.
- Session time - the time the session will take place.
- Session end time - an optional field to specify an end time for the session.
- Deleted status - choose between Active and Deleted. Deleted school sessions will still be shown, but will not allow any bookings.
WARNING
If the date is amended, this will not update the default name, and so we recommend this is manually updated to reflect your changes.
On the Location screen, complete the following fields:
- Location - choose the applicable Location from the drop-down. This dropdown is populated by the information within the Locations tab.
- School - choose the applicable Location from the drop-down. This dropdown is populated by the information within the Schools tab.
WARNING
If you amend the school and/or location, this will not update the default name, and so we recommend this is manually updated to reflect your changes.
Click Next.
On the Years screen, confirm which school years are included within this session by using the Yes/No radio buttons.
TIP
If Year 14+ is needed for your school, it needs to be set up as a Special school to reveal that option.
Click Next.
On the Immunisation team screen, select an Immunisation team using the drop-down.
The following optional fields can also be amended:- On the day admin team - select from the drop-down.
- On the day clinical team - select from the drop-down.
- Pharmacy - select from the drop-down.
WARNING
If the on the day teams are not configured here, tasks for these teams will not appear for any patients assigned to these sessions.
Click Next.
The Review screen will show.Click Finish to save your changes.
A confirmation will be shown, click Return to dashboard.
TIP
If there are changes made to the times and location of the session, an email will be sent to affected patients to advise them of the changes.
Clinic Sessions
All clinic sessions will be shown on this dashboard.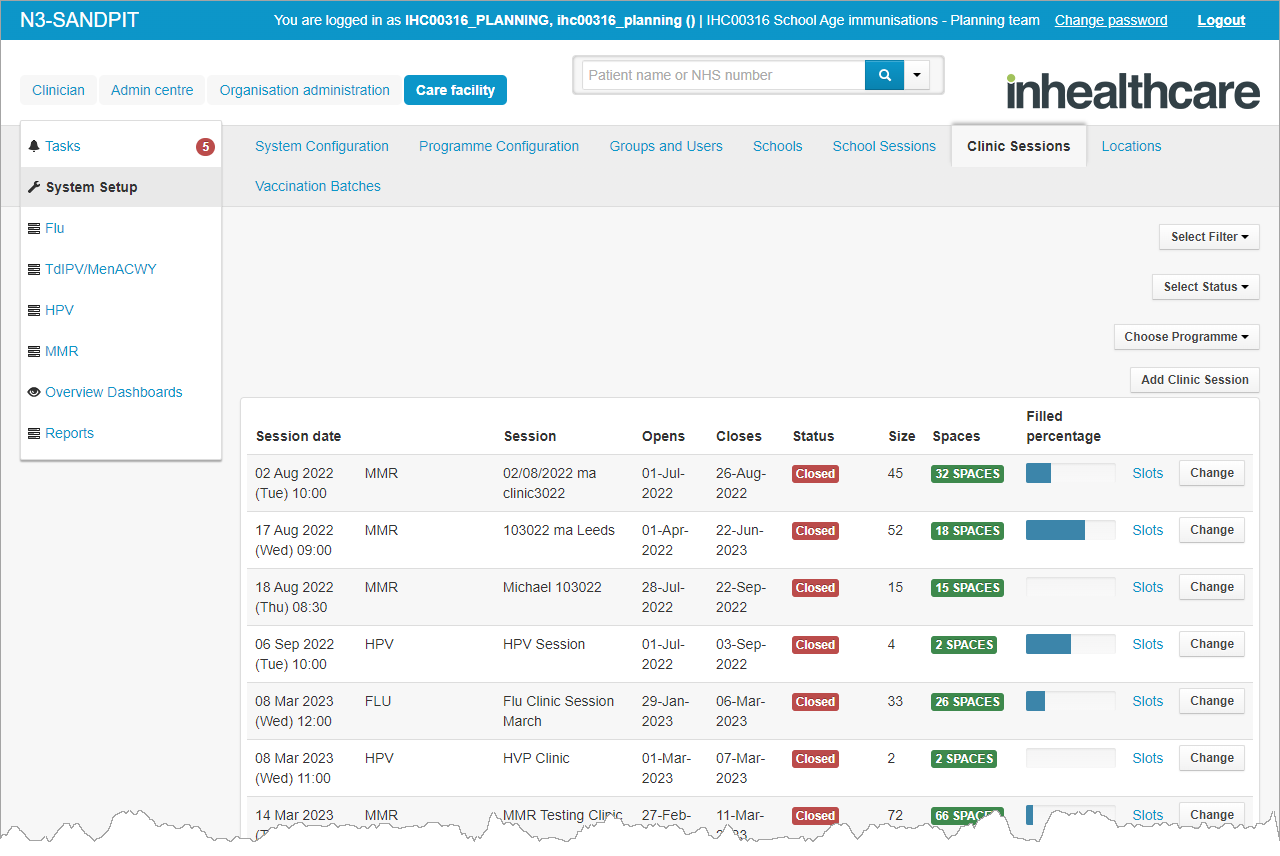
Information shown can be filtered using the dropdown options at the top right of the dashboard:
Select Filter - This will allow you to filter to All sessions or Future sessions.
Select Status - This will allow you to filter between All, Active and Deleted.
Choose Programme - This will allow you to filter between the different vaccinations or display all.
The dashboard will display all sessions in order of their date. The Session date is when the appointments will take place. The type of immunisation will be displayed along with the Session name.
If the enrolment form is filled out on a date which falls on or between the opens and closes dates shown, the patient will be assigned to this session date, if there is a slot available.
The status shown refers to whether enrolment forms can still be submitted for a session, not whether the session date has passed.
Columns showing the size and spaces for each session will also display.
- Size - shows total number of appointments available within that session
- Spaces - the number of appointments left within that session
A filled percentage bar will display how full the session is, clicking on the blue slots link will show a further breakdown of the time, size, and spaces available for each session.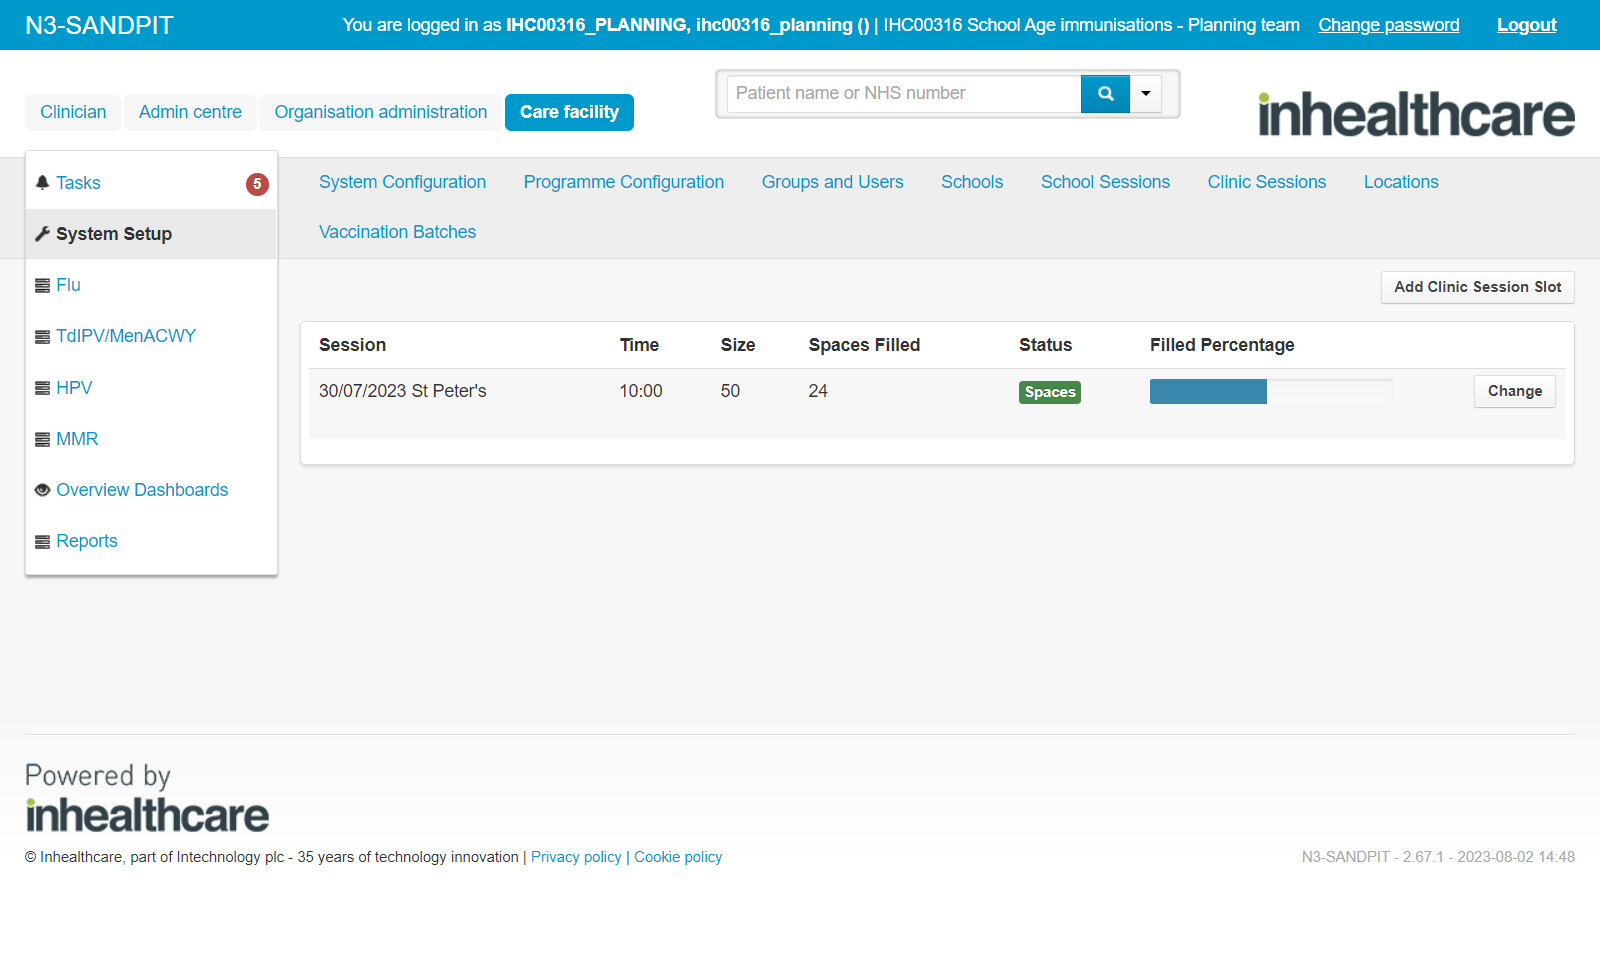
Slots can be added on this screen by clicking the Add Clinic Session Slot and completing the following fields on the Session Slot screen:
The slots can be amended by clicking the Change button and completing all fields on the Session Slot screen.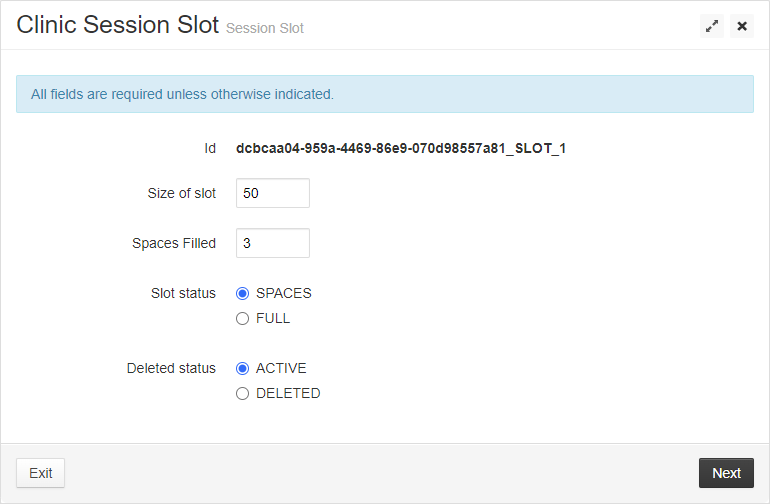
TIP
A session date will always take place on or after the closing date.
Adding a Clinic Session
To create a new clinic session:
Click Add Clinic Session.
On the Clinic Session screen, complete the following fields:
- Program - choose the applicable programme from the drop-down. This dropdown is populated by the information within the Programme Configuration tab.
WARNING
Do not use past programmes to create a your new session.
- Use default name - it is recommended that the Use default name option is ticked as this will auto-populate the name of the session with important details; including the date and location of the session. If this is not ticked, an additional Name field will appear.
- Session opens - the date from which enrolment forms can be completed to book onto this session.
- Session closes - the date from which enrolment forms can no longer be completed to book onto this session. This should be a date on or after after the session opens date.
- Session date - the date the session will take place. This should be a date on or after after the session closes date.
- Session time - the time the session will take place.
- Session end time - an optional field to specify an end time for the session.
- Deleted status - choose between Active and Deleted. Deleted school sessions will still be shown, but will not allow any bookings.
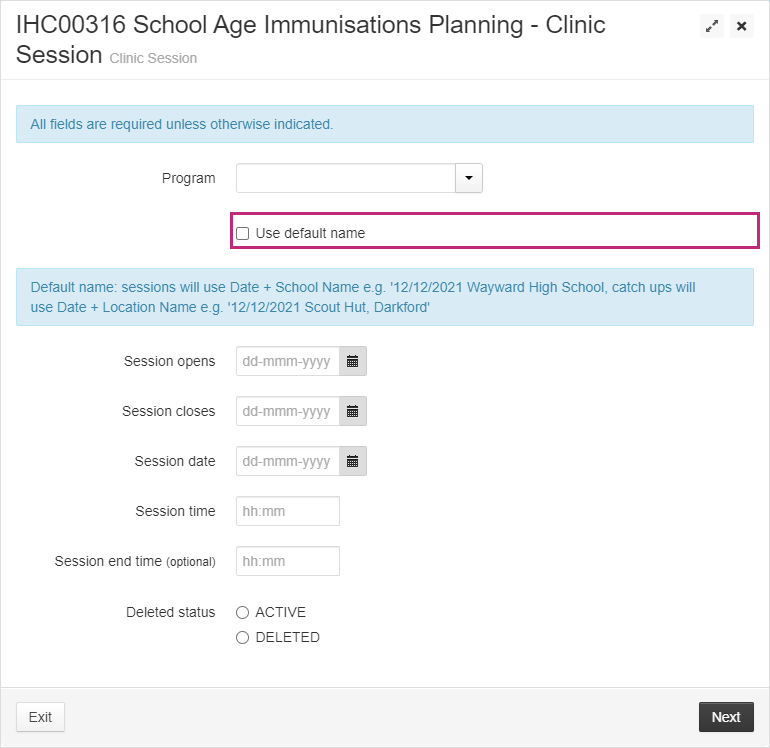
Click Next.
On the Location screen, complete the following fields:
- Location - choose the applicable Location from the drop-down. This dropdown is populated by the information within the Locations tab.
- Number of slots - enter the number of slots to be created for this session.
- Size of slot - enter the number of patients who can be assigned to each slot.
- Slot duration (mins) - enter the time each slot will last.
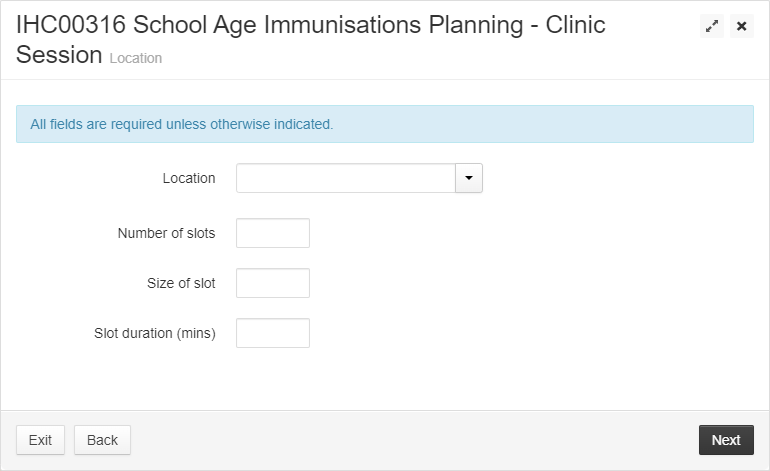
Click Next.
On the Immunisation team screen, select an Immunisation team using the drop-down.
The following optional fields can also be amended:- On the day admin team - select from the drop-down. This team are an optional additional team who can mark the attendance of patients for the session.
- On the day clinical team - select from the drop-down. This team can take attendance just like the On the day admin team but they are clinically trained and can make clinical decisions as to whether the child can or cannot have the vaccine.
- Pharmacy - select from the drop-down.
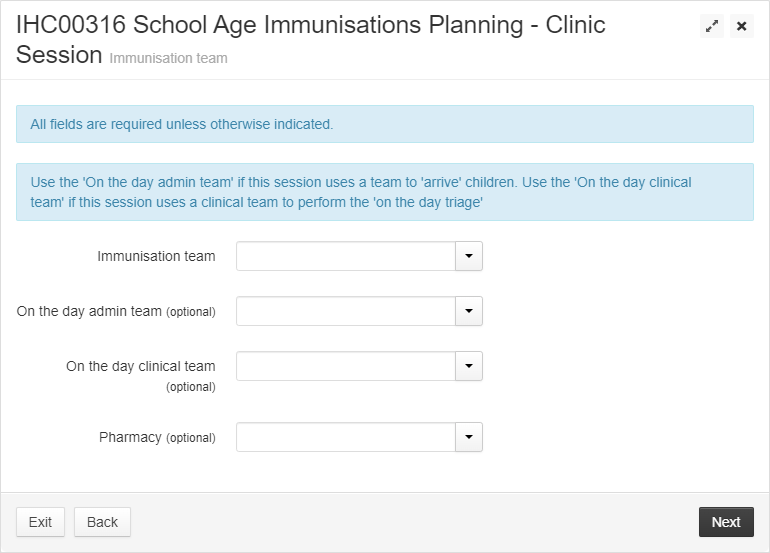
WARNING
If the on the day teams are not configured here, tasks for these teams will not appear for any patients assigned to these sessions.
Click Next.
The Review screen will show.Click Finish.
A confirmation will be shown, click Return to dashboard.
Changing a Clinic Session
Sessions which have not taken place can be amended by:
Click Change on the applicable session.
On the Session screen, complete the following fields:
- Name - it is recommended that you keep this in the same format of date, location.
- Session opens - the date from which enrolment forms can be completed to book onto this session.
- Session closes - the date from which enrolment forms can no longer be completed to book onto this session. This should be a date on or after after the session opens date.
- Session date - the date the session will take place. This should be a date on or after after the session closes date.
- Session time - the time the session will take place.
- Session end time - an optional field to specify an end time for the session.
- Deleted status - choose between Active and Deleted. Deleted school sessions will still be shown, but will not allow any bookings.
You will be advised that any changes will trigger an email to be sent to consenting adults of all patients booked onto the session.
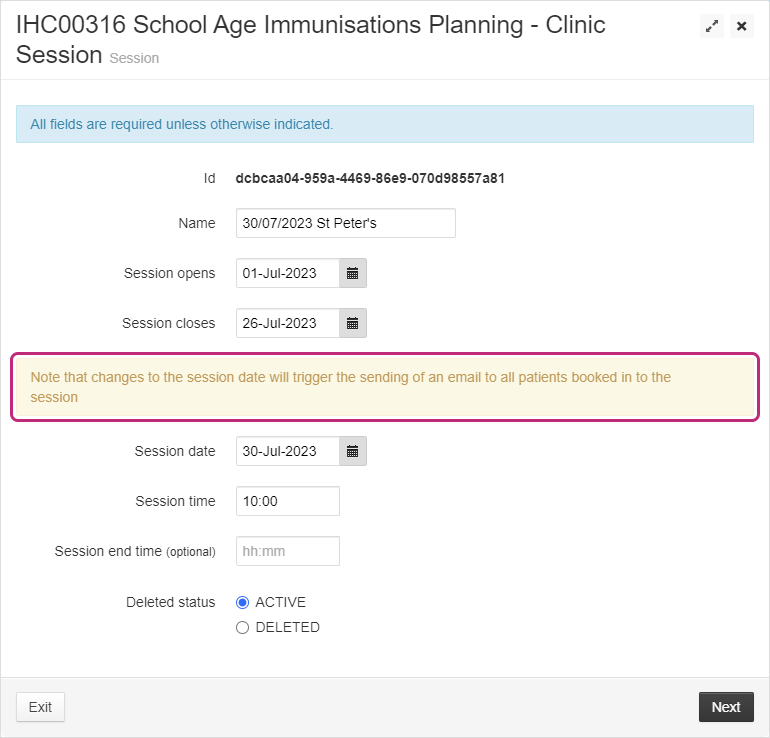
WARNING
If the date is amended, this will not update the default name. We recommend this is manually updated to reflect your changes.
On the Location screen, choose the applicable Location from the drop-down. This dropdown is populated by the information within the Locations tab.
WARNING
If you amend the school and/or location, this will not update the default name. We recommend this is manually updated to reflect your changes.
Click Next.
On the Immunisation team screen, select an Immunisation team using the drop-down.
The following optional fields can also be amended:- On the day admin team - select from the drop-down.
- On the day clinical team - select from the drop-down.
- Pharmacy - select from the drop-down.
TIP
If the on the day teams are not configured here, tasks for these teams will not appear for any patients assigned to these sessions.
Click Next.
The Review screen will show.Click Finish to save your changes.
A confirmation will be shown, click Return to dashboard.
TIP
If there are changes made to the times and location of the session, an email will be sent to affected patients to advise them of the changes.
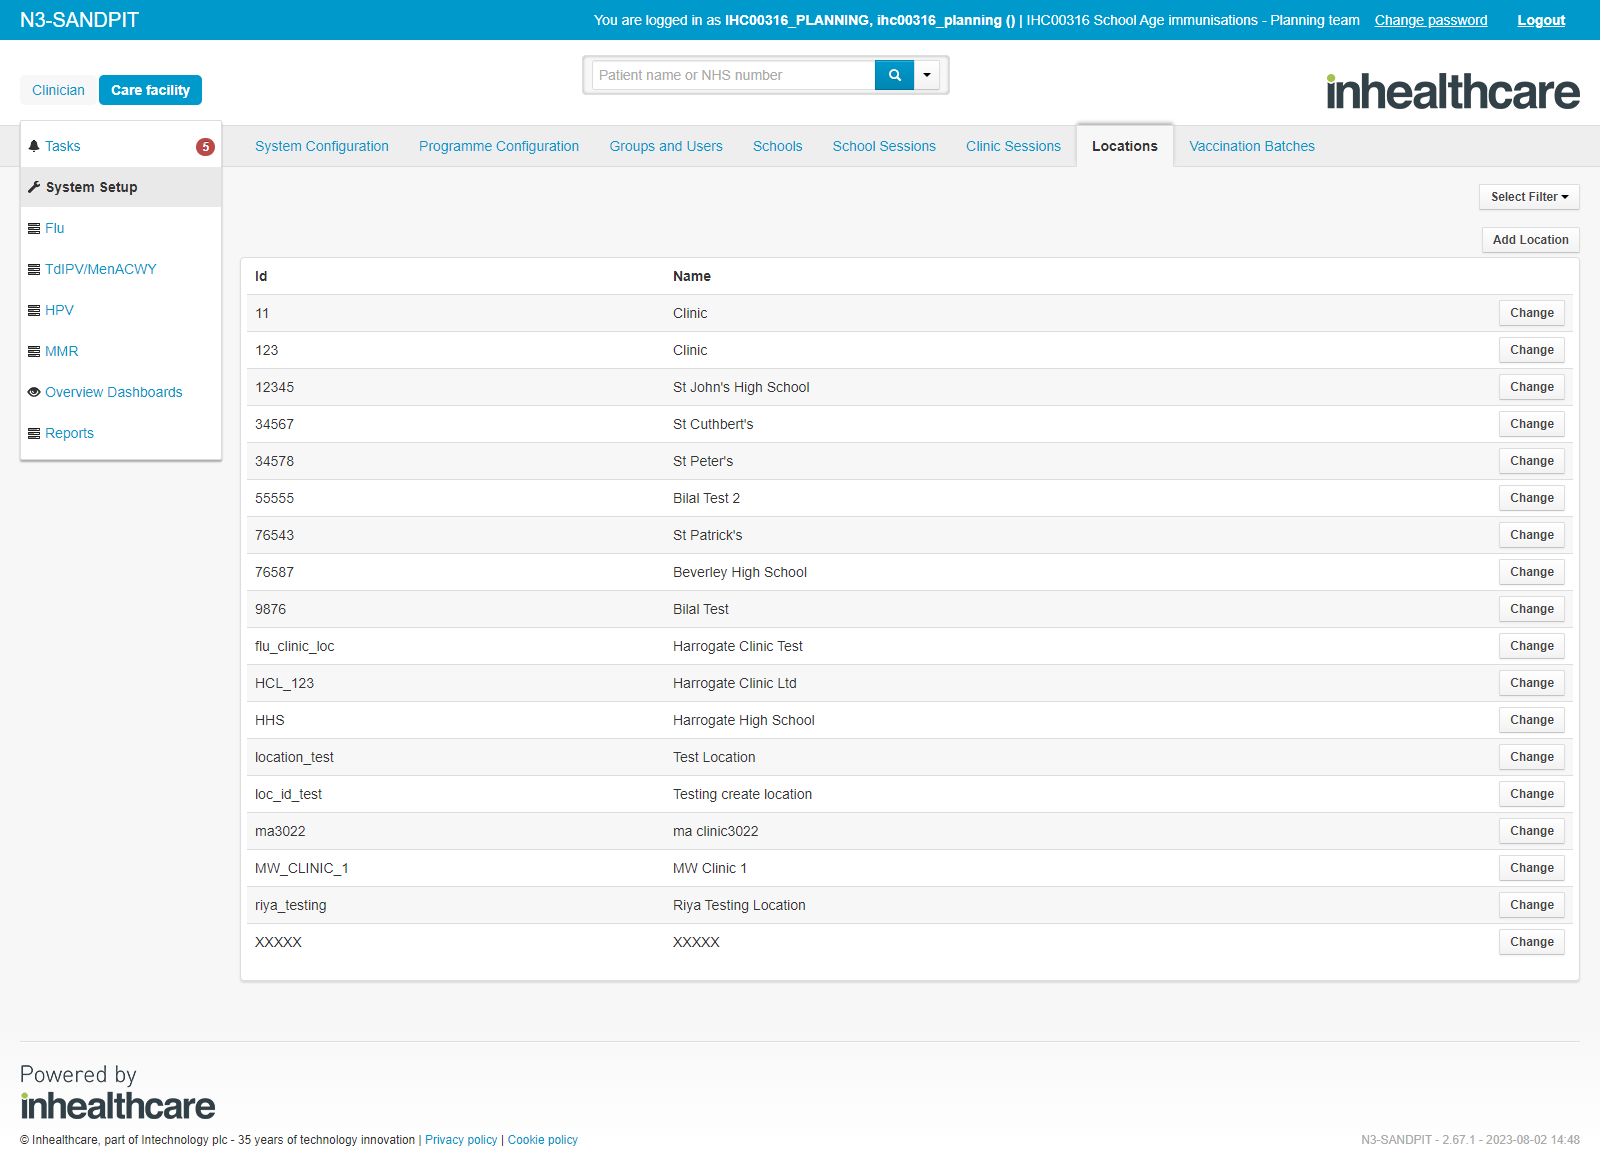
Locations
A comprehensive list of all schools and clinics for your organisation will be shown on this dashboard including each location's:
- ID
- Name
- School/Clinic label
The list of locations can be filtered using the Select filter dropdown, in the top right of the dashboard, to show:
- All
- Active
- Deleted
Adding a New Location
TIP
Only a Clinic location can be added on this tab. If you are looking to add a school, this needs to be done on the Schools tab.
To add a new clinic location:
Click Add Clinic Location.
On the Location screen, complete the following fields:
- ID - this must be unique
- Name - the name of the new location
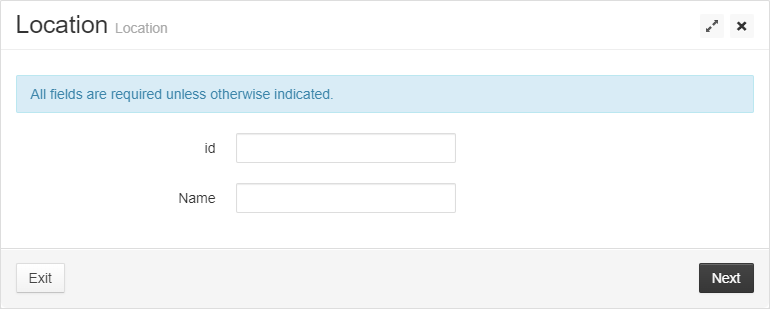
Click Next. The Review screen will show.
Click Finish to save your changes.
A confirmation will be shown, click Return to dashboard.
Amending a Location
To make changes to a location:
Click Change on the applicable location.
On the Location screen, complete the following fields:
- Name - the name of the location.
TIP
The location ID cannot be changed, but the name can. If you are using a new unique reference number, this should be set up as a new location.
- Deleted status - choose between Active and Deleted. Deleted locations will still be shown, but cannot be assigned to sessions.
WARNING
To prevent issues with any scheduled sessions, ensure that there are no schools or clinics linked to the location before deleting.
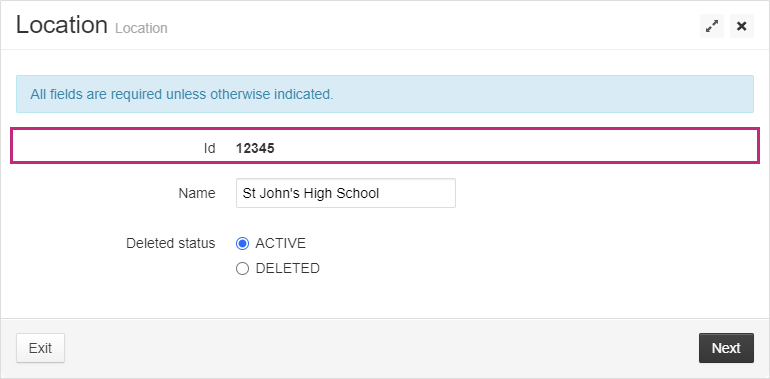
Click Next. The Review screen will show.
Click Finish to save your changes.
A confirmation will be shown, click Return to dashboard.
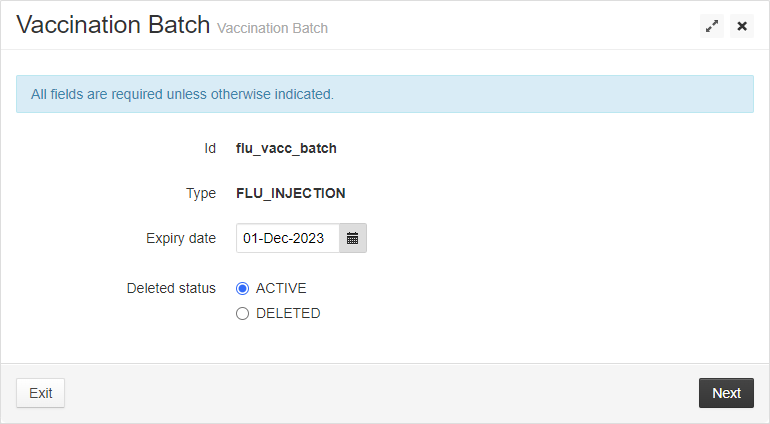
Vaccination Batches
Details of the vaccines can be viewed, added and amended here.
The list of vaccine batches can be filtered using the Select filter dropdown, in the top right of the dashboard, to show:
- All
- Active
- Deleted
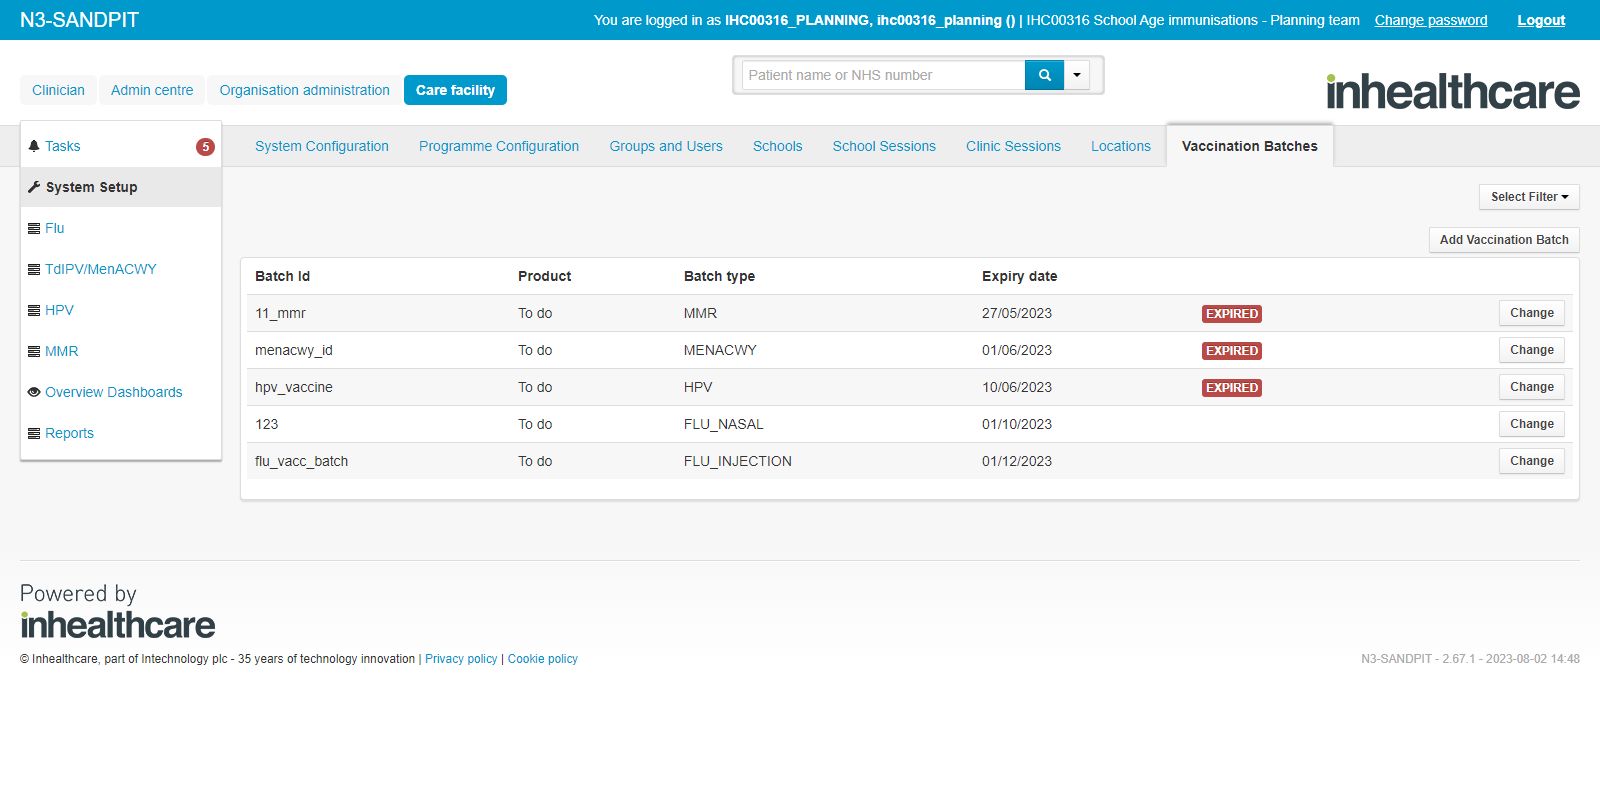
TIP
Batches which have expired will be marked with a red status.
Adding a Vaccination Batch
To add a vaccine batch:
Click Add Vaccination Batch.
On the Vaccination Batch screen, enter:
- ID - the batch ID number.
- Type - use the radio buttons to select the type of vaccine.
- Expiry date - use the calendar function.
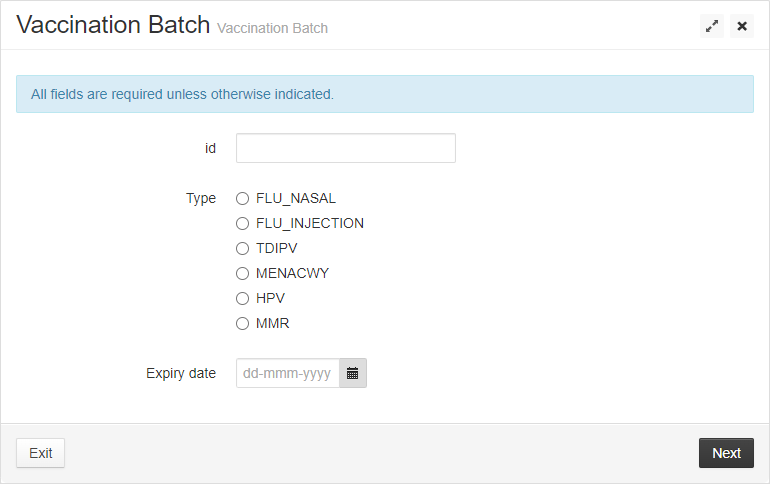
Click Next.
The Review screen will show.Click Finish to save your changes.
A confirmation will be shown, click Return to dashboard.
Amending a Vaccination Batch
To make changes to a vaccination batch:
TIP
The batch ID and vaccine type cannot be changed.
Click Change on the applicable batch.
On the Vaccination Batch screen, complete the following fields:
- Expiry date - use the calendar function.
- Deleted status - choose between Active and Deleted. Deleted batches will not be shown on the dashboard.
Click Next.
The Review screen will show.Click Finish to save your changes.
A confirmation will be shown, click Return to dashboard.